

This amazing Mulberry and Pistachio Fudge is dairy-free and is from Donna at Eighty20Nutrition.
If you are looking for a free-from treat, this simply made fudge is probably the one for you. Try it out.
This amazing Mulberry and Pistachio Fudge is dairy-free and is from Donna at Eighty20Nutrition.
If you are looking for a free-from treat, this simply made fudge is probably the one for you. Try it out.
Another good recipe for the slow-cooker. I’m not sure where I got this recipe from but I have been making it for years; originally on the hob and in the oven, but last year I graduated it to my slow-cooker and it works really well. I still seal off the meat (and veg) in my fry pan as I believe it gives this stew just another touch of delicious taste.
Using a plastic bag to coat the meat is just so easy and saves getting messy fingers. A quick shake and the meat is perfectly coated in flour and seasonings.
I’ve written the recipe as I usually make it but this time I exchanged ordinary quartered onions for the shallots, and chantenay carrots for the baby carrots as that was what was in my vegetable basket and needed using up. I usually have a packet or two of chestnuts in my store cupboard and there is always beef stock in my freezer so apart from getting some fresh thyme and the steak, I was good to go.
INGREDIENTS:
1lb lean braising steak, cut into 1” cubes
2 tablespoons gluten-free flour or buckwheat flour
Salt and freshly ground black pepper
2 teaspoons ground nutmeg
2 teaspoons oil of choice, olive or coconut
8 shallots, peeled and left whole
2 garlic cloves, peeled and crushed
8oz baby carrots, topped and left whole
Carton of tinned chopped tomatoes
Zest of 1 lemon
¾ pint good, hot beef stock
7fl oz good red wine
1 tablespoon fresh thyme leaves
7oz cooked and peeled whole chestnuts
METHOD:

Steak coated in buckwheat flour and seasonings
In a large plastic food bag, mix the flour, salt, pepper and nutmeg. Add the beef and shake to coat.
Heat the oil in a large fry pan and cook the beef for 4 to 5 minutes until browned on all sides. Transfer to a slow cooker.

Ready for a long slow cook
In the same fry pan, cook the shallots, garlic and carrots for 2 to 3 minutes and pour over the beef together with the tomatoes.
Add the lemon zest, stock, red wine, thyme leaves and chestnuts.
Cover and cook for 7 to 10 hours on LOW.
Serve with either cauliflower rice, or your favourite mix of brown/red /black rice. Alternatively, this stew goes really well with a mustard mash.

NB: All photographs used in this blog have been taken by me, and are of food I have prepared and served myself.
The lemon curd used in this recipe is probably one of the nicest curds I’ve tasted. It is so lemony – not a synthetic lemon, nor a too sweet lemon, which so many are, but really fresh and tasty and tangy. I was so pleased that I decided to make a double batch of the curd as I now have a super jarful in the fridge to enjoy.
As soon as I saw this recipe I decided it had to be one of my Christmas desserts – who doesn’t like the delicious clean tang of lemon after a Christmas meal. I needed to make the curd and tarts a few days before Christmas as I was rather tied up just beforehand, but the pastry cases kept really well in the fridge and I quickly refreshed them in a hot oven before filling them. The lemon curd seems to keep very well sealed in a kilner jar and I don’t think it will last long enough to deteriorate.
I made six 10cm tarts and a few small gluten-free pastry tartlets.
INGREDIENTS:
3 eggs
6 tablespoons coconut oil or ghee (I used half and half), melted
3 tablespoons raw honey
½ teaspoon vanilla extract
¼ teaspoons sea salt
½ cup + 3 tablespoons coconut flour (measure carefully)
1 batch of lemon curd (see below)
¼ cup filtered water
1 ¼ teaspoons grass fed gelatin
METHOD:
In a large bowl, whisk the eggs until foamy.
Add melted fat, honey, vanilla extract and salt and whisk again.
Sift the coconut flour and mix in to the egg mixture until thoroughly combined.
The mixture starts very runny but soon turns into a soft pastry.
Grease some fluted individual tart tins (six) or one large tart tin with oil. Press the pastry carefully into the tins making sure it is not too thick.
Bake at 350°F for about 11 to 13 minutes.
Leave to cool in the tins before carefully removing. If you don’t want to fill the tarts immediately, store in an airtight container in the fridge.
In a small bowl, sprinkle the gelatin on to the water and leave to bloom. Leave the bowl over hot water and stir until the gelatin has dissolved completely.
Very gently heat the lemon curd, add the dissolved gelatin and whisk until completely mixed. Allow the curd to come to room temperature if storing in the fridge before using.
Pour the lemon mix into the tartlet cases and leave in the fridge to set (at least 2 hours).
Top with your favourite fruit, raspberries, blueberries or redcurrants.

Lemon Tarts made with Coconut Flour

Little lemon tartlets in gluten-free pastry

Stir the lemon mix continuously
LEMON CURD:
INGREDIENTS:
2 eggs
2 egg yolks
1/3 cup raw honey
½ cup fresh lemon juice
Zest from 2 lemons
Pinch of sea salt
6 tablespoons coconut oil or ghee (I used half and half)
METHOD:

Store in an airtight container
Whisk together the eggs, yolks, honey, lemon juice, lemon zest and salt in a small saucepan. Add the coconut oil or ghee and cook on low until the fat is completely melted, stirring all the time.
Turn the heat up to medium and continue to cook, stirring continuously, until the mixture thickens – about 5 to 7 minutes. At this stage you will see tiny bubbles beginning to come to the surface of the curd.
Strain through a sieve into a container and, once cool, seal and keep in the fridge. This curd thickens even more as it sets.
This absolutely delicious recipe has been slightly adapted from Luscious Lemon Tarts by Katja from Savory Lotus
NB: All photographs used in this blog have been taken by me, and are of food I have prepared and served myself.

As a member of U.K. Health Bloggers, we occasionally share other member’s recipes. My contribution this week starts with these delicious Cranberry seed crackers which are from Donna at Eighty20Nutrition
One of those dreary, rainy Sunday mornings and I had a fridge-full of bits and pieces which I wanted to use up as we were going away for a few days.
At the back of my mind was the wonderful assortment of entrées we were tempted with on a recent holiday and I decided to try and make something similar to what I had seen.
I had some green and black olives in the fridge (I’ve given approximate weights but a few grams either way won’t matter), about the same quantity of some sundried-tomatoes in oil, half a tub of cream cheese and a growing thyme plant on the window sill.
It really did only take a minute or so to make the tapenade using up the left-over ingredients and it was soon sitting in the fridge waiting for me to make the blinis.
The proper recipe for the blinis involves whisking the wet ingredients before adding the dry, but I am all for ease so put the lot in my Nutribullet and blitzed them all together and it worked well. I was given the recipe by my d-in-law who used it at Christmas to make some smoked salmon blinis. The recipe is adapted from Nom Nom Paleo
For a very, spur of the moment, made-up lunch using left-overs, I cannot state too strongly just how tasty these little morsels were. My husband was delighted to try them and it is a recipe which takes only a few minutes to make and yet comes out so appetizing.
INGREDIENTS:

Quick blitz in a Nutribullet
Tapenade:
Approximately 70g each of green and black olives (pitted)
Approximately 70g sun-dried tomatoes drained of oil
2 garlic cloves
Lug of olive oil
Juice of 1 lemon
Handful of fresh thyme leaves
Start by making the tapenade. Pop all ingredients into a Nutribullet or blender and do a short blitz. You want the mix chopped but not smooth. Pop into a dish and refrigerate.
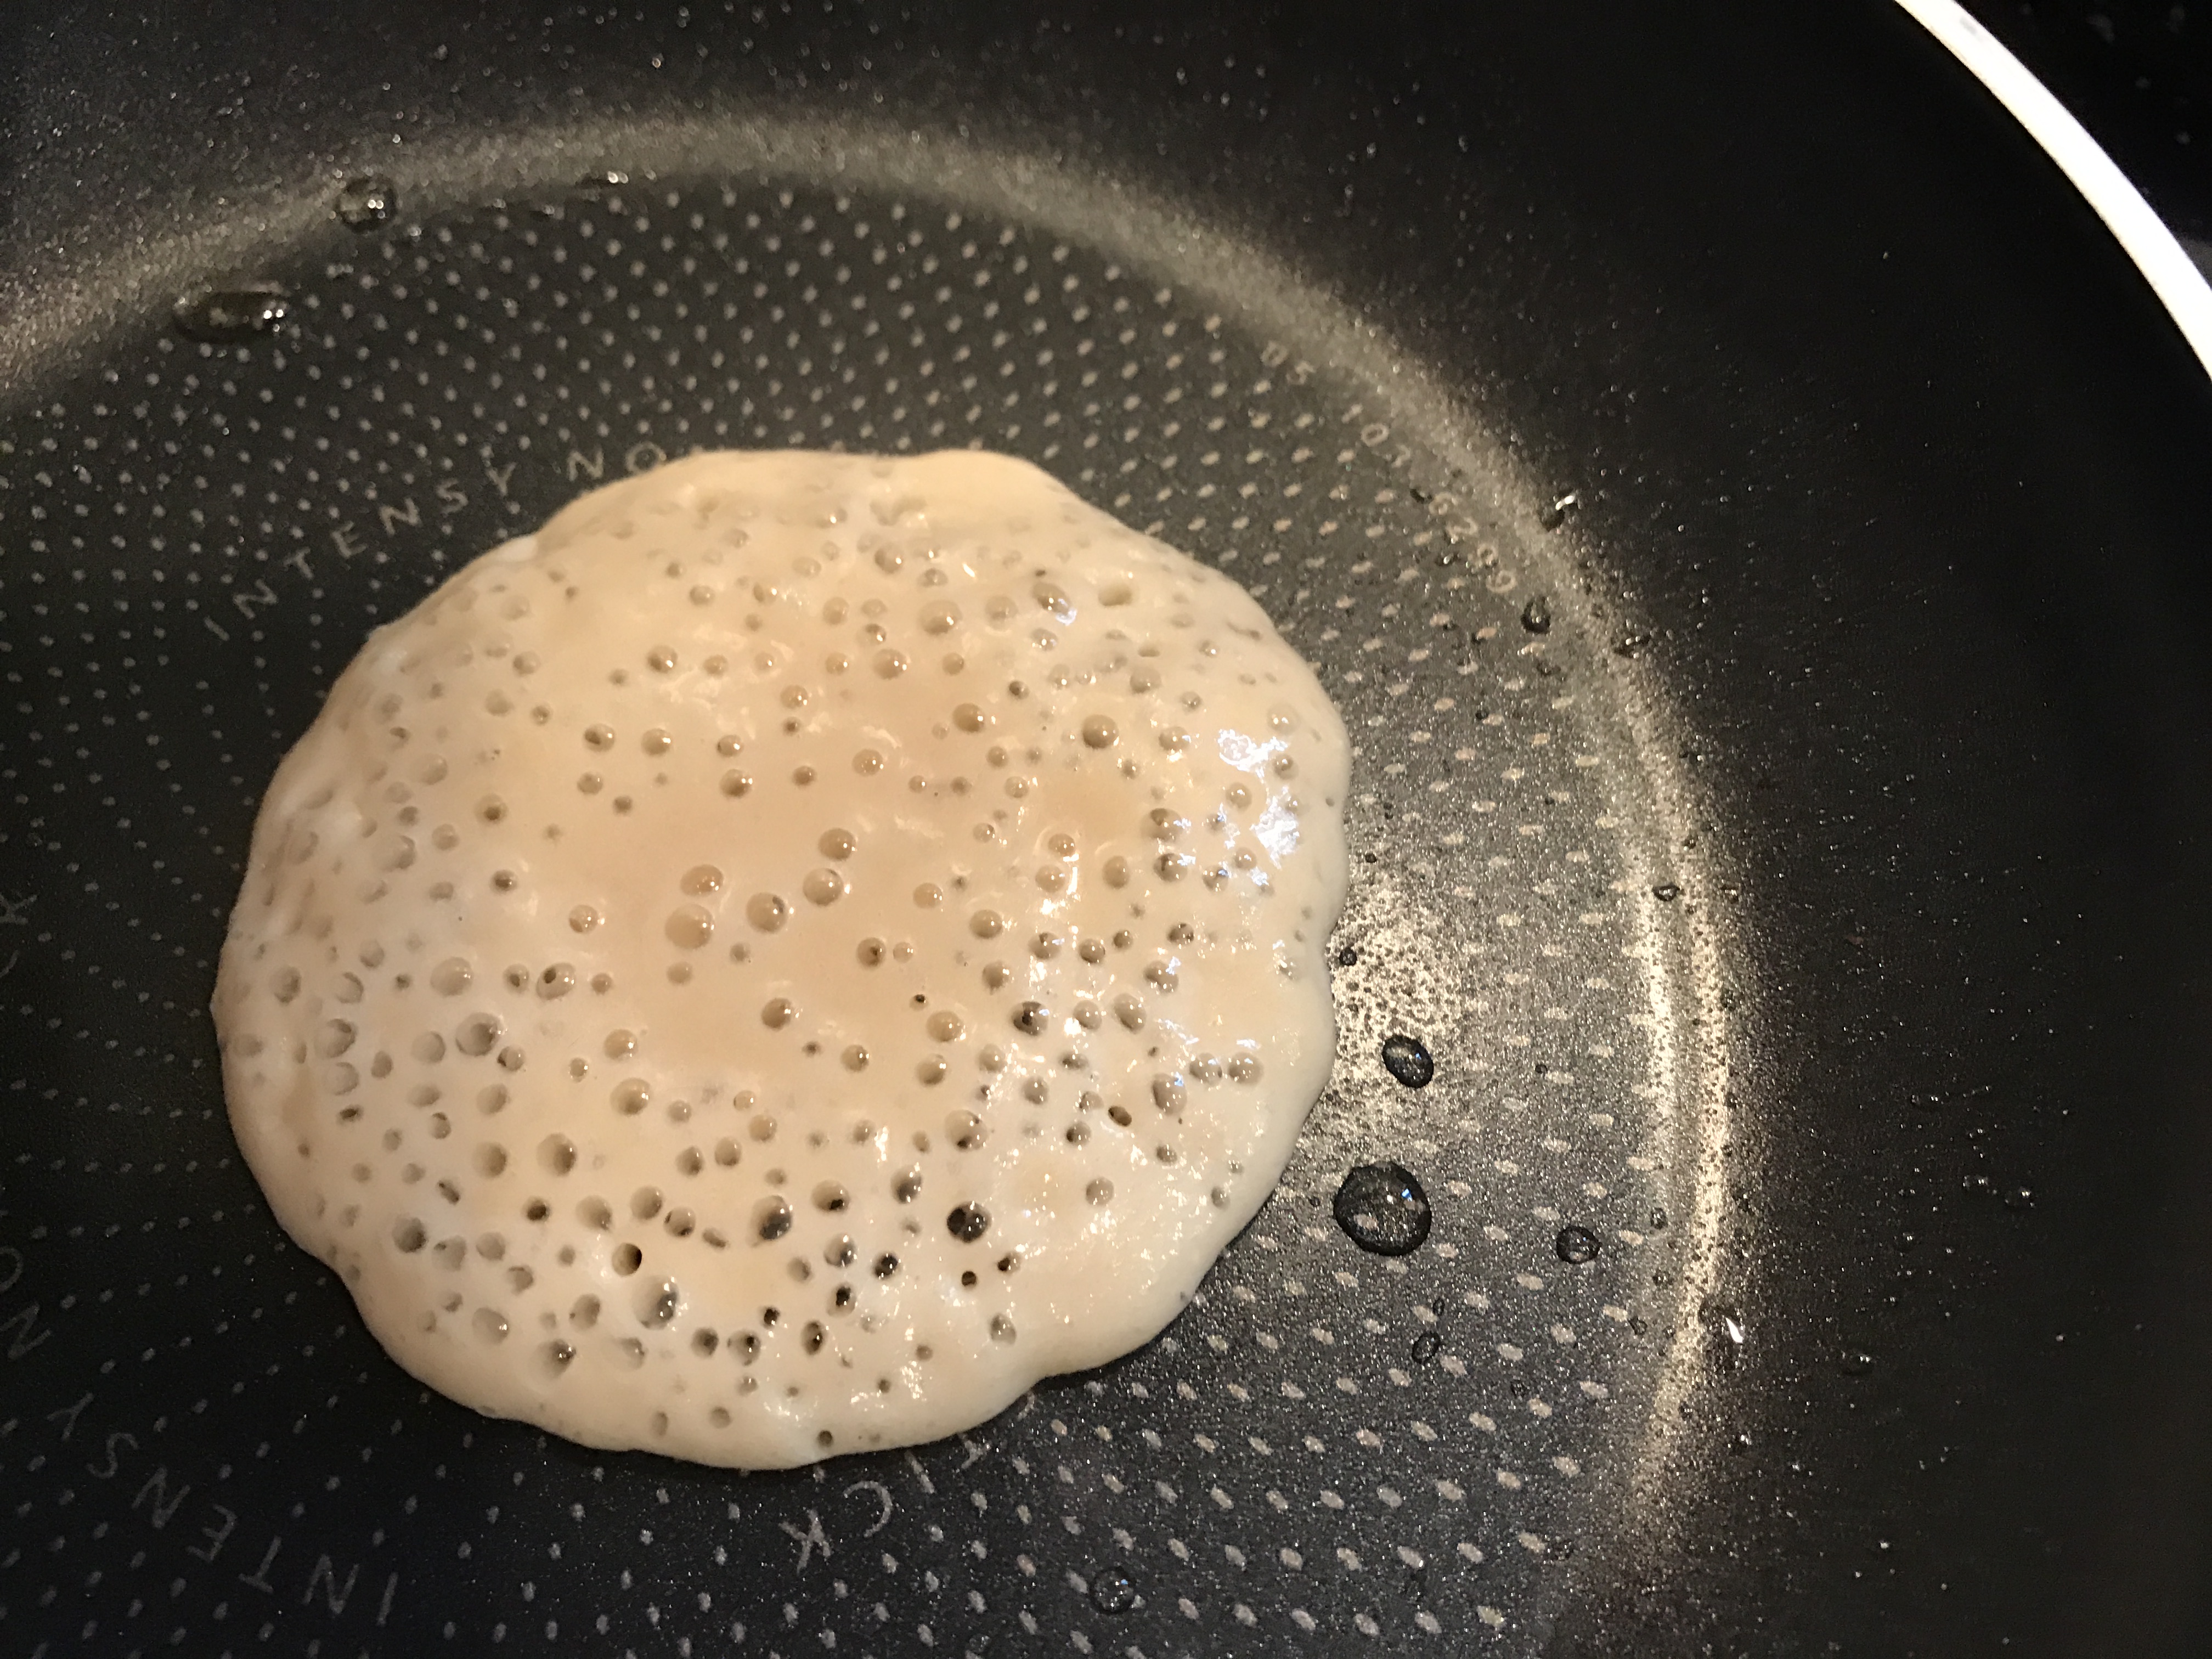
Wait for bubbles before flipping over
Blinis:
2 large eggs
3 tablespoons full-fat coconut milk
½ ripe banana
½ teaspoon apple cider vinegar
¼ teaspoon garlic powder
1 ½ tablespoons coconut flour (plus extra if too runny)
¼ teaspoon baking soda
½ teaspoon salt
Oil of choice for frying (ghee or coconut oil)
For the blinis, pop all ingredients into a blender or Nutribullet and blitz until mixed. Allow to stand for a minute or two and blitz again. If the mixture is too runny, add a tiny bit more coconut flour.
Heat oil in a fry pan and drop a tablespoon of the blini mixture in. Wait to see bubbles forming on the surface before quickly flipping over and continuing to cook for about 30 seconds. Keep warm (in a clean tea towel) whilst you cook the remainder.
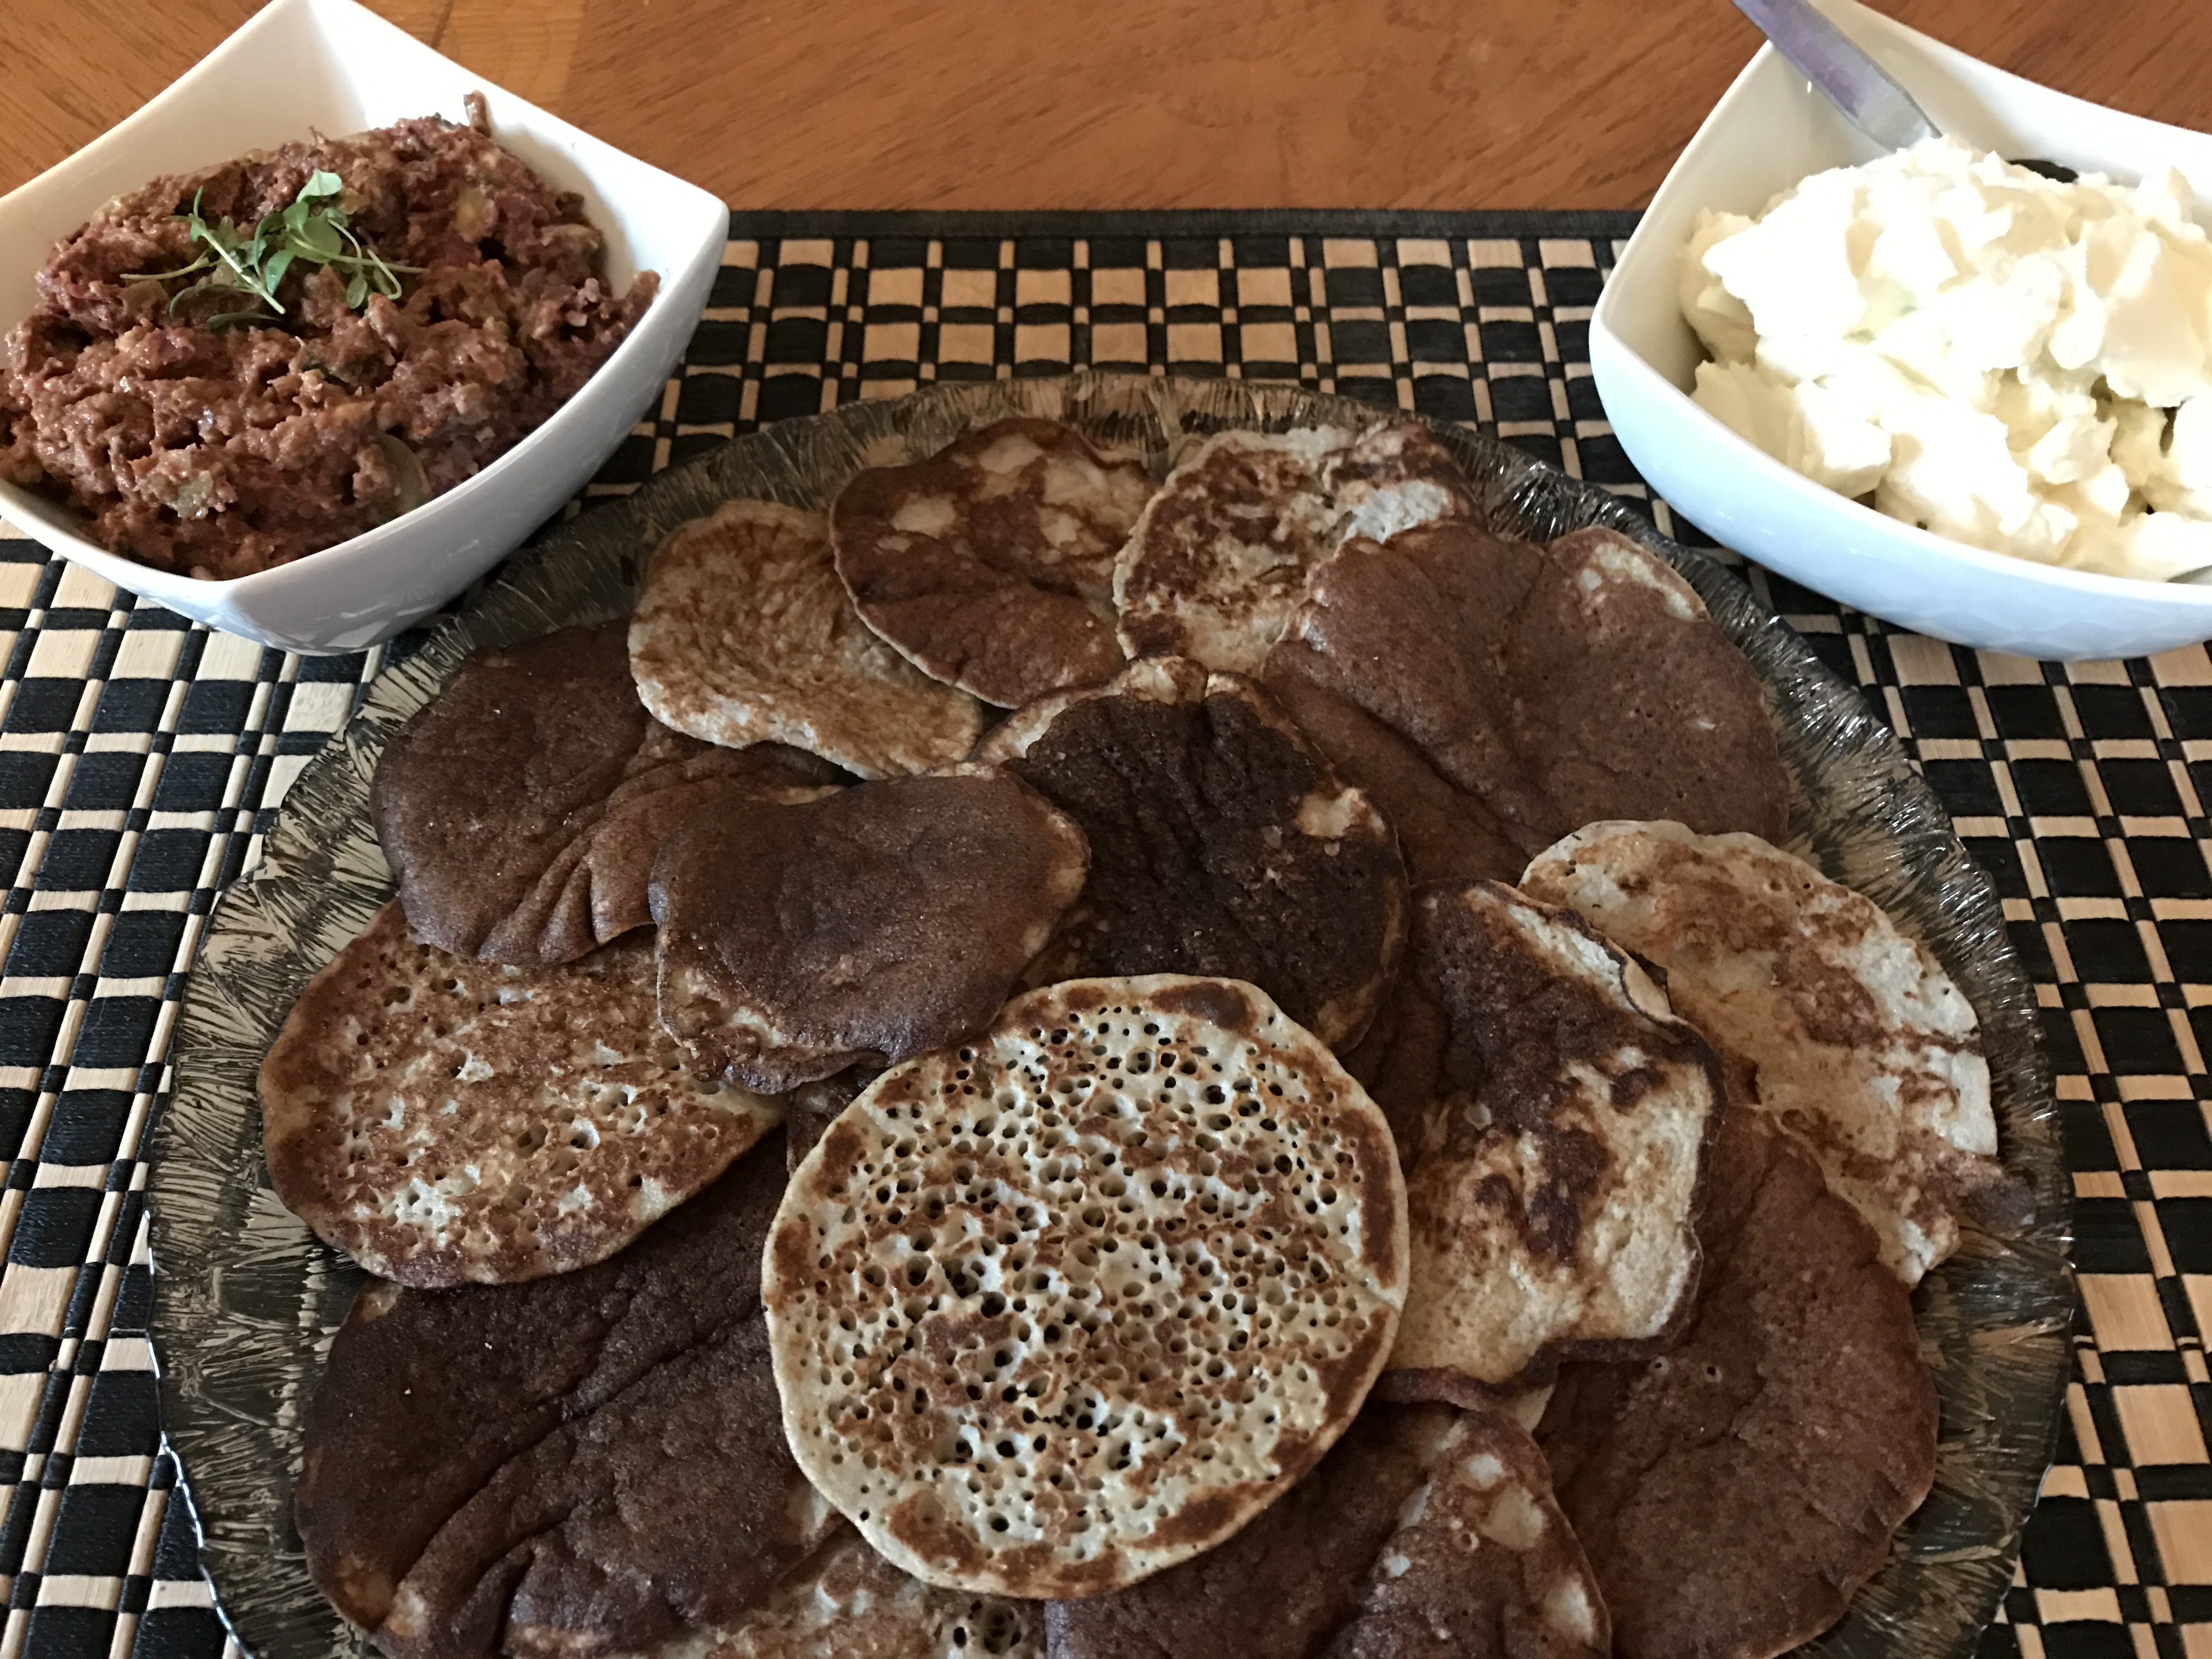
Olive Tapenade, Blinis and Cream Cheese
Serve spread with a layer of cream cheese and a layer of tapenade before folding the blini in half.
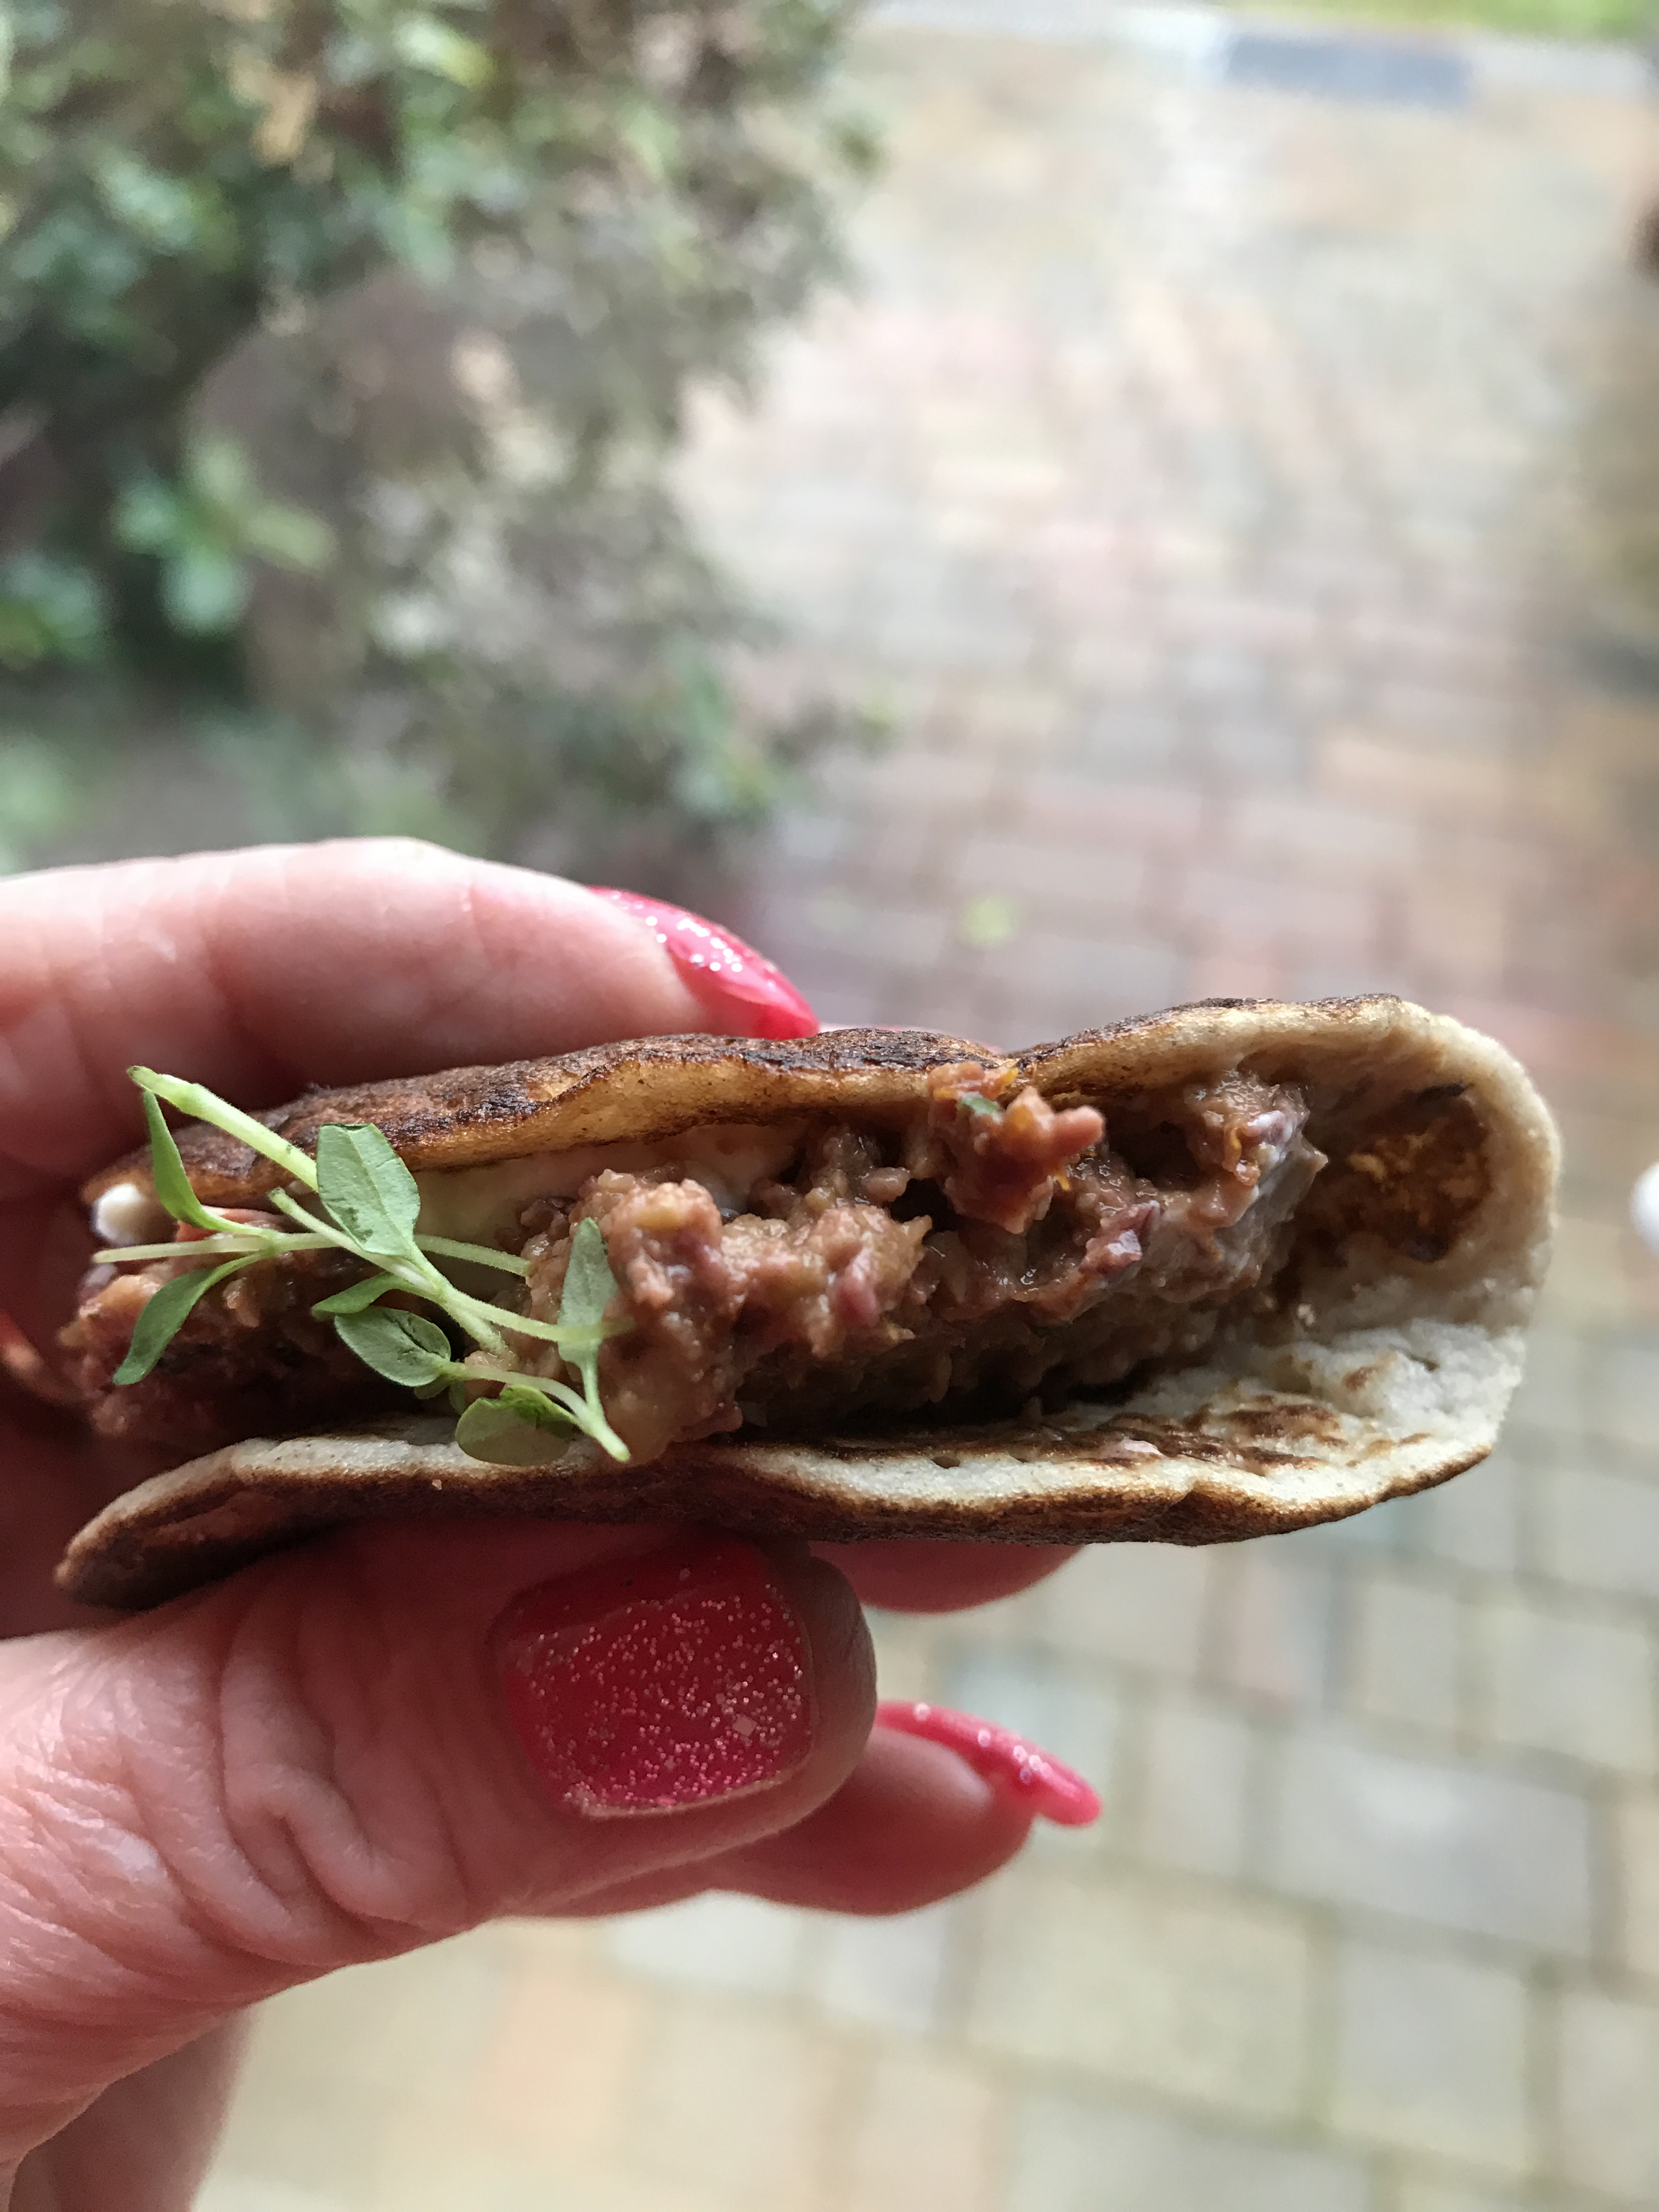
Two bites of delicious-ness
I haven’t frozen blinis but I understand they can be frozen in a single layer until solid and then stored in a bag for future use.
This recipe made approximately 18 small blinis. These little olive blinis would be ideal to hand around at a party, or serve as a starter to a main meal.
NB: All photographs used in this blog have been taken by me, and are of food I have prepared and served myself.
In a creative mood, I had a bag of easy-peeler oranges sitting in my kitchen and wondered whether I could incorporate them into a cake. I make a Chocolate Orange cake occasionally which is delicious, but fancied something a little different.
These buns are a little bit like a marmalade rock cake – they are sticky to eat but make you want to lick your fingers for more ! I did wonder whether the peel/zest of easy-peeler oranges was any different from ‘ordinary’ oranges, but the flavour is wonderfully marmalady (is that a word?)
INGREDIENTS:
5 medium-sized easy-peeler oranges
½ cup raw honey x 2
3 cups almond flour
1 teaspoon baking powder (gluten-free)
3 large eggs
METHOD:
Place 3 of the oranges in cold water in a saucepan. Bring to the boil and simmer with the lid on for about 40 minutes, or until the skin is very soft.
Remove from the water, place in a food processor and blitz until smooth. If they are likely to have pips, cut in half and remove before blitzing.
In a large bowl, whisk one 1/2 cup honey and the eggs until frothy and creamy.
Add the almond flour, baking powder and oranges and mix until combined.
Fill muffin cases almost full with the cake mix and bake for about 40 minutes at 350°F until a cocktail stick inserted comes out clean.
Whist the buns are cooking, grate the zest from the remaining oranges and place in a saucepan with the squeezed juice and the second ½ cup of honey. Simmer for a few minutes over a low heat until the mixture thickens and becomes lovely and syrupy.
As soon as the cakes are cooked, drizzle over a couple of teaspoons of hot syrup and leave to cool in the cases.
Sticky Orange Buns
I was able to make 18 ‘buns’ with this recipe and had enough syrup to drizzle over 2 teaspoons on each making them lovely and sticky.
NB: All photographs used in this blog have been taken by me, and are of food I have prepared and served myself.
Every-so-often we come across a dish which we keep to one side so that we can cook it for a special occasion, or for when friends come around, or perhaps for Christmas. This Korean Beef was one such dish and as soon as I saw the recipe, I knew it had to be for a special occasion. It’s not a cheap dish to cook, but it is well worth the extra expense for a special meal.
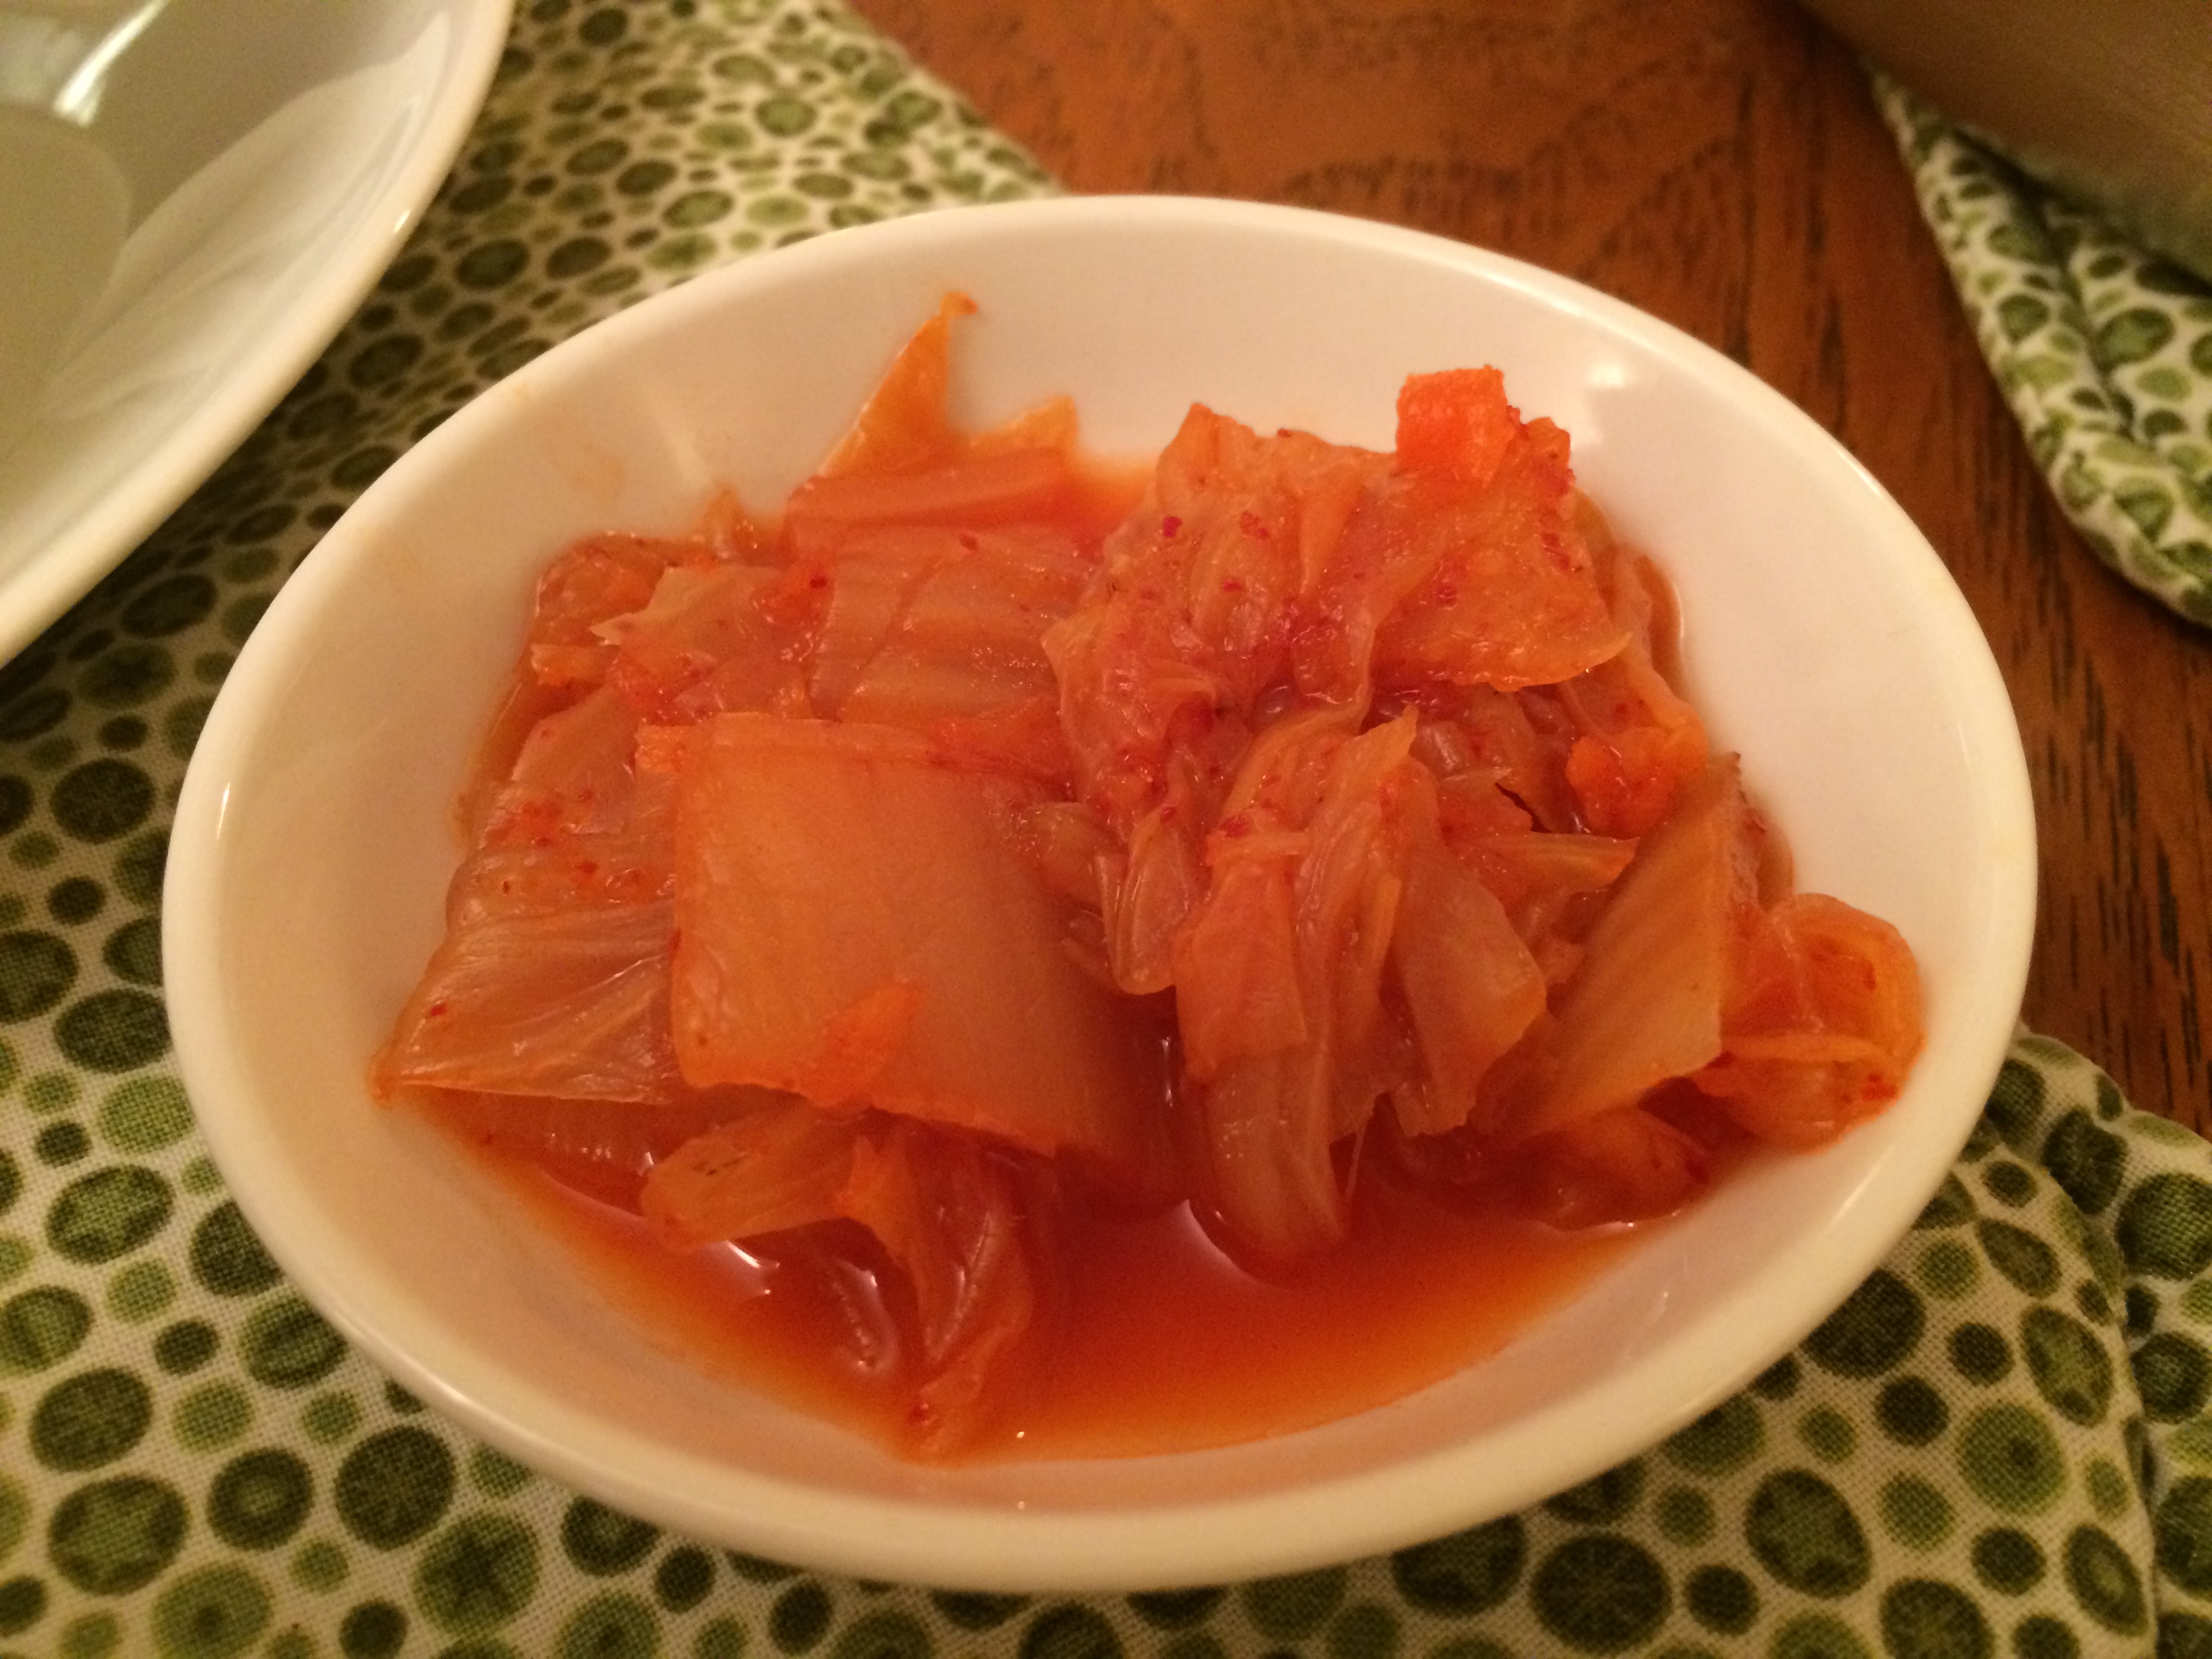
Kimchi
This dish only takes a few minutes to prepare; then about three hours in a slow cooker. I mixed all the ingredients together earlier in the day and just added them to the beef 3 hours before we wanted to eat.
The beef was melt-in-the-mouth tender and I served it with rice noodles and Kimchi (a traditional fermented Korean side dish made of vegetables with a variety of seasonings) which was available at my local supermarket.
INGREDIENTS:
2lb beef sirloin
½ onion, thinly sliced
6 garlic cloves, minced
1 tablespoon fresh ginger, finely minced
1 teaspoon chilli flakes
½ cup Tamari
½ cup coconut sugar (palm sugar)
1/3 cup beef stock
1 ½ tablespoons Sriracha
2 tablespoons rice wine vinegar
1 tablespoon sesame oil
4 or 5 spring onions, finely sliced
1 tablespoon sesame seeds
METHOD:
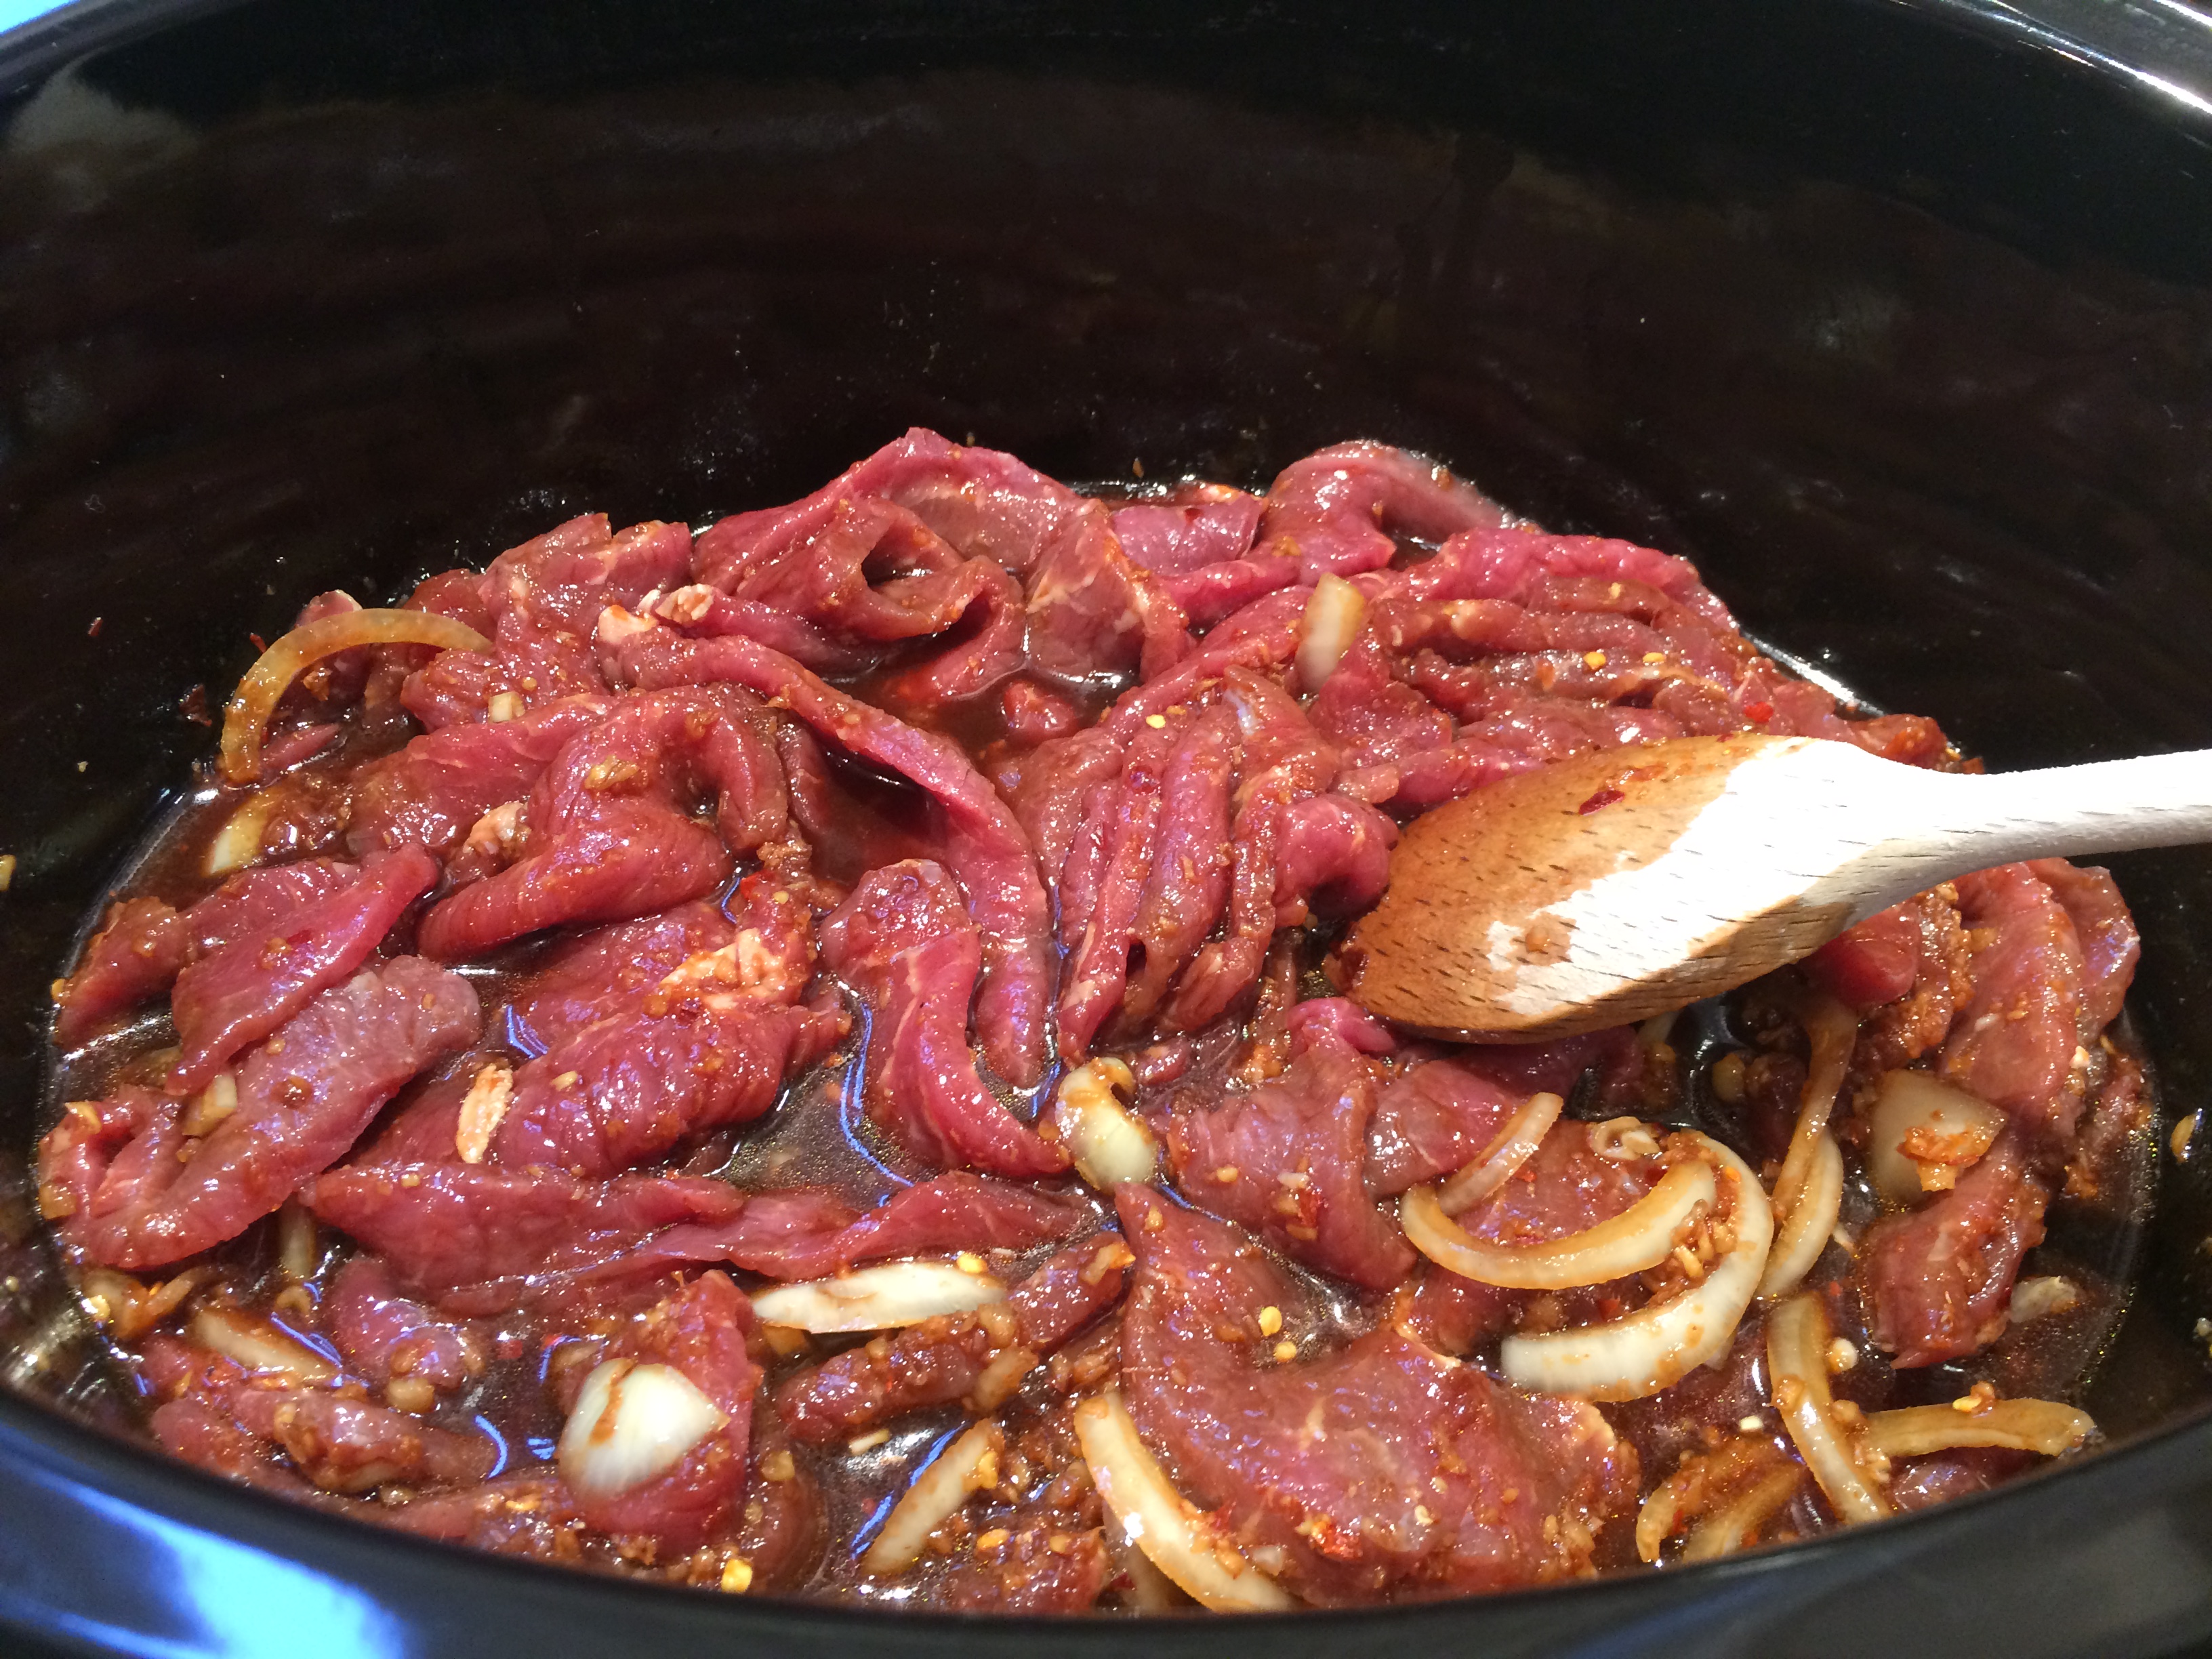
Gently mix together in a slow cooker
Ask your butcher to thinly slice the sirloin so you end up with long, thin strips.
Mix together the onion, garlic, ginger, chilli flakes, Tamari, sugar, stock, Sriracha, vinegar and sesame oil and pour into a large slow cooker.
Add the beef strips a few at a time, ensuring they are completely covered in the sauce.
Cover and cook on LOW for 2 hours.
Mix about 4 teaspoons of cornflour with 2 tablespoons of cold water and stir through the beef.
Continue to cook for another hour.
Serve topped with thinly sliced spring onions and sesame seeds, accompanied by rice noodles and Kimchi.
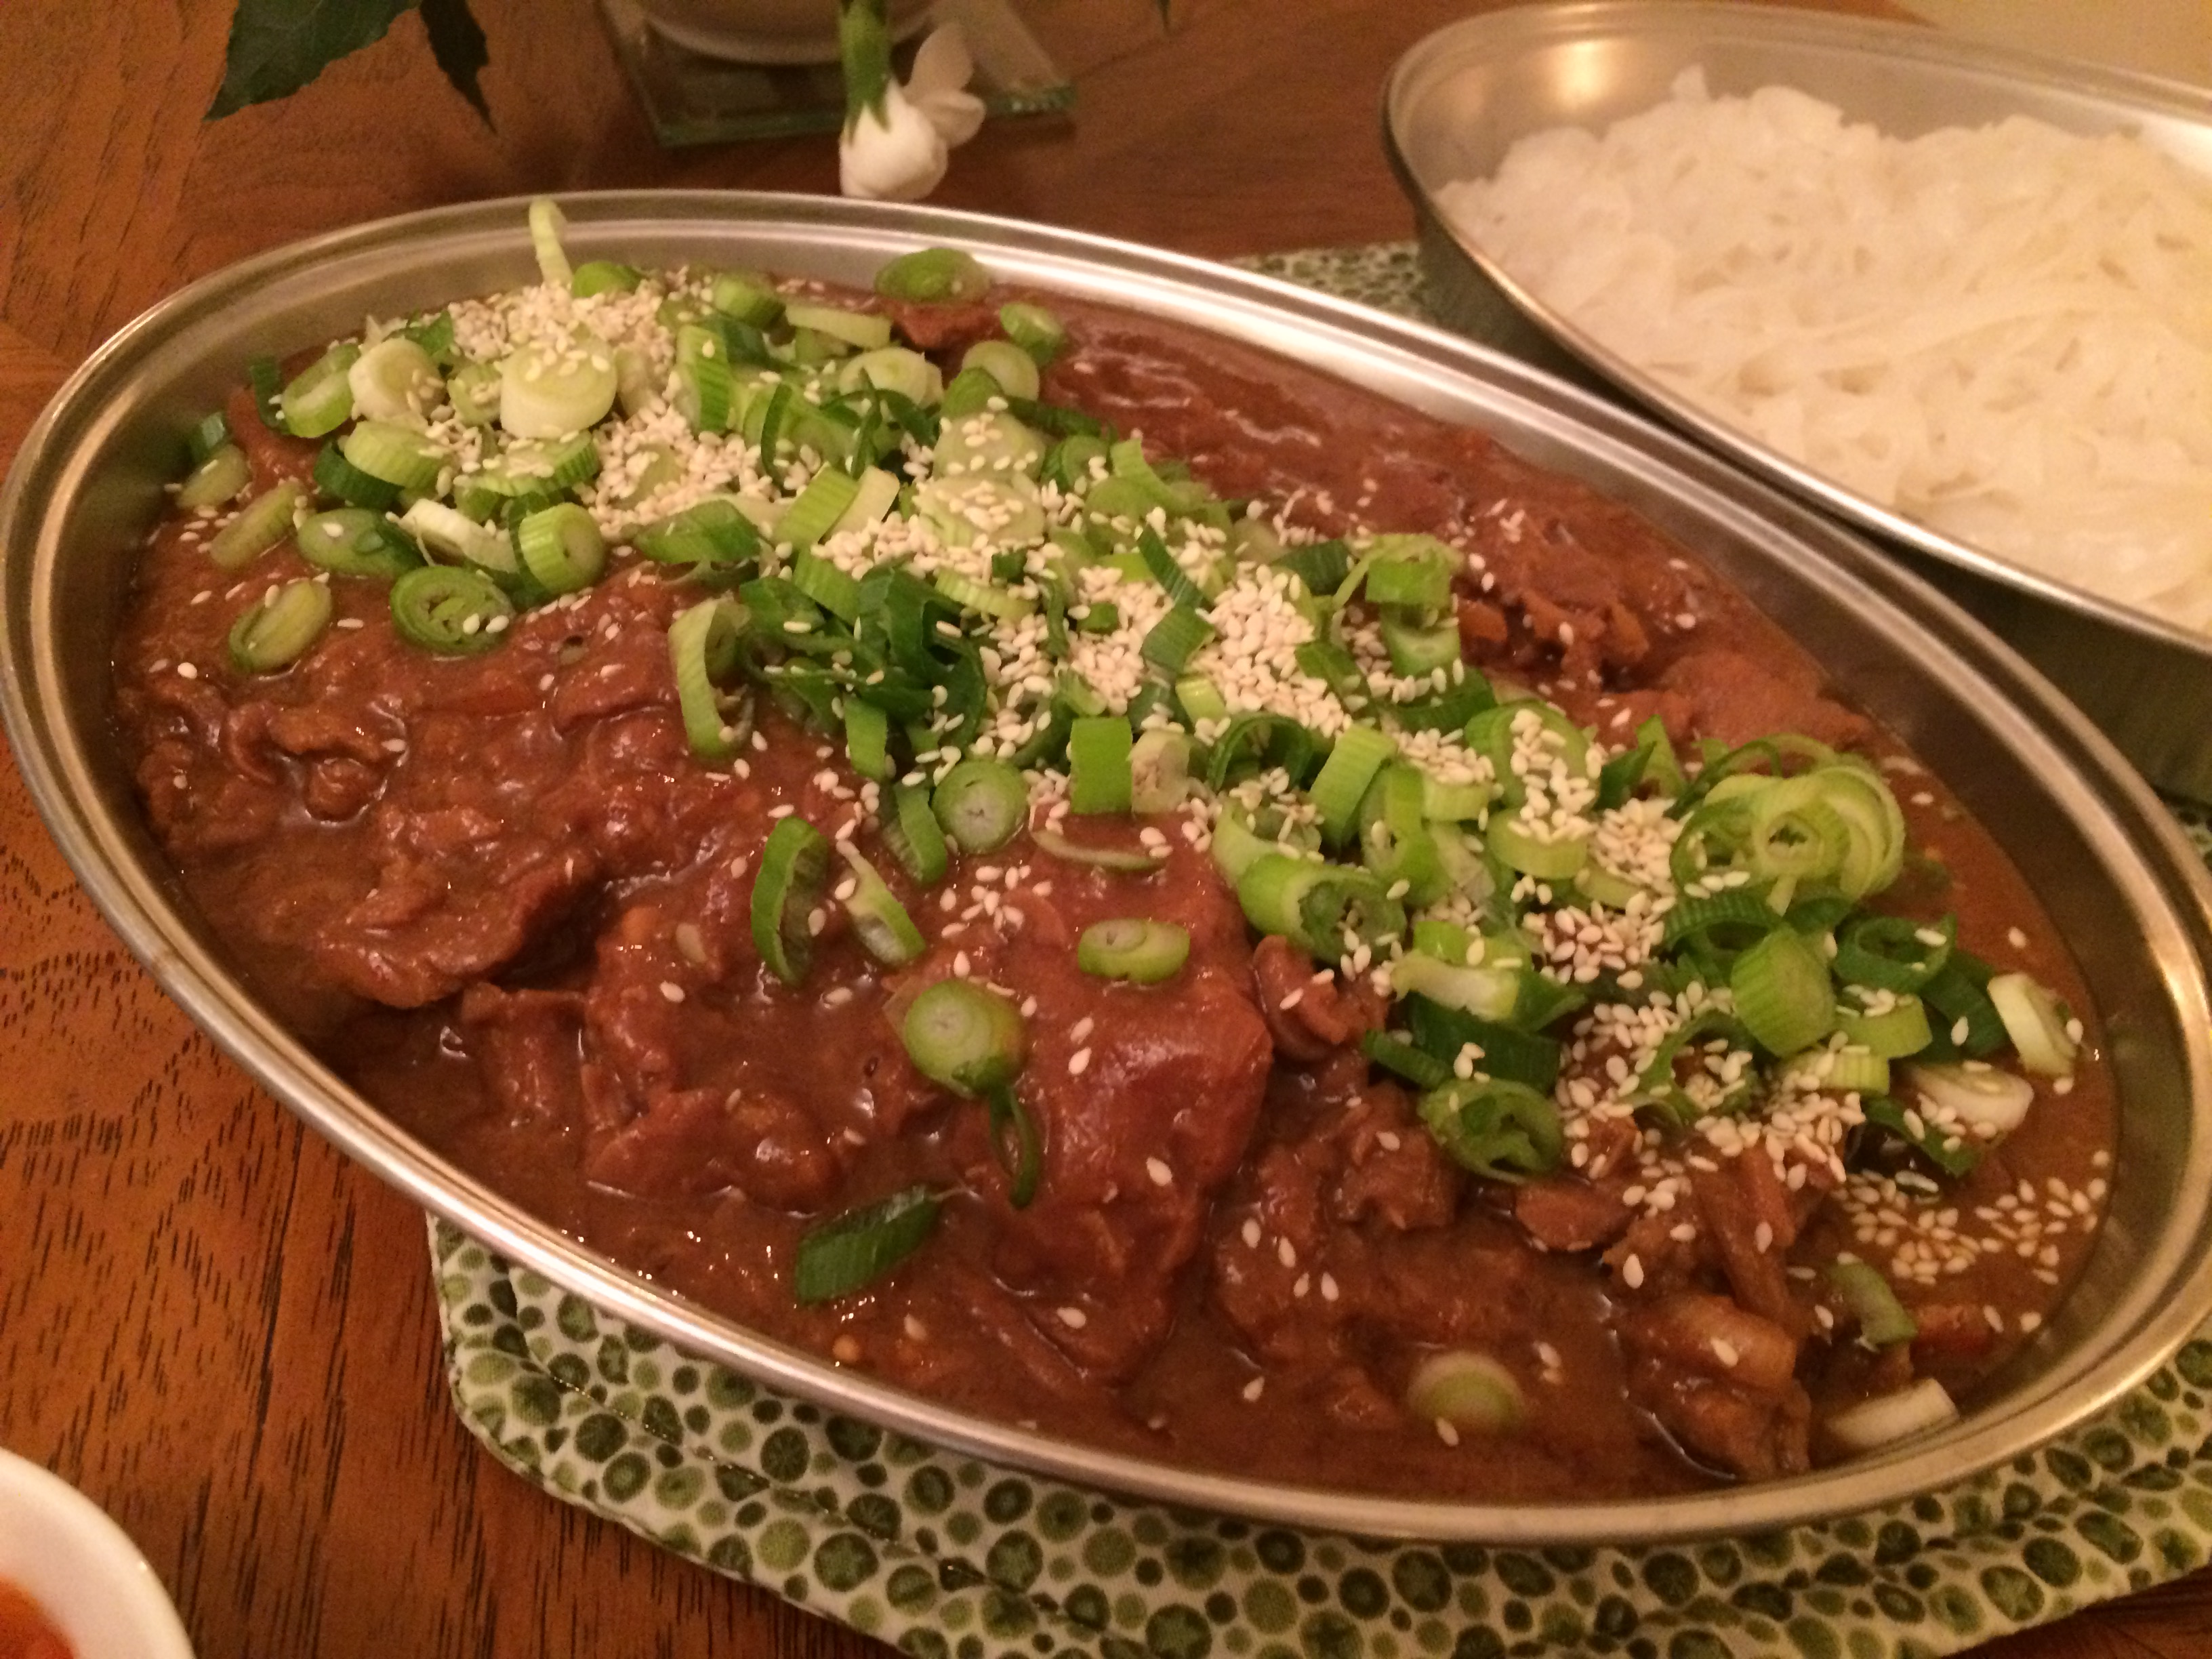
Beautiful Korean Beef
Recipe adapted from Cooktopcove
NB: All photographs used in this blog have been taken by me, and are of food I have prepared and served myself.
Last Autumn a lovely friend on the Isle of Wight gave me a huge supply of beautiful red eating apples. They were windfalls but that didn’t matter one bit. I have no idea of the variety of apple but they were pink fleshed and I was soon peeling, coring and chopping away before cooking them down prior to freezing them.
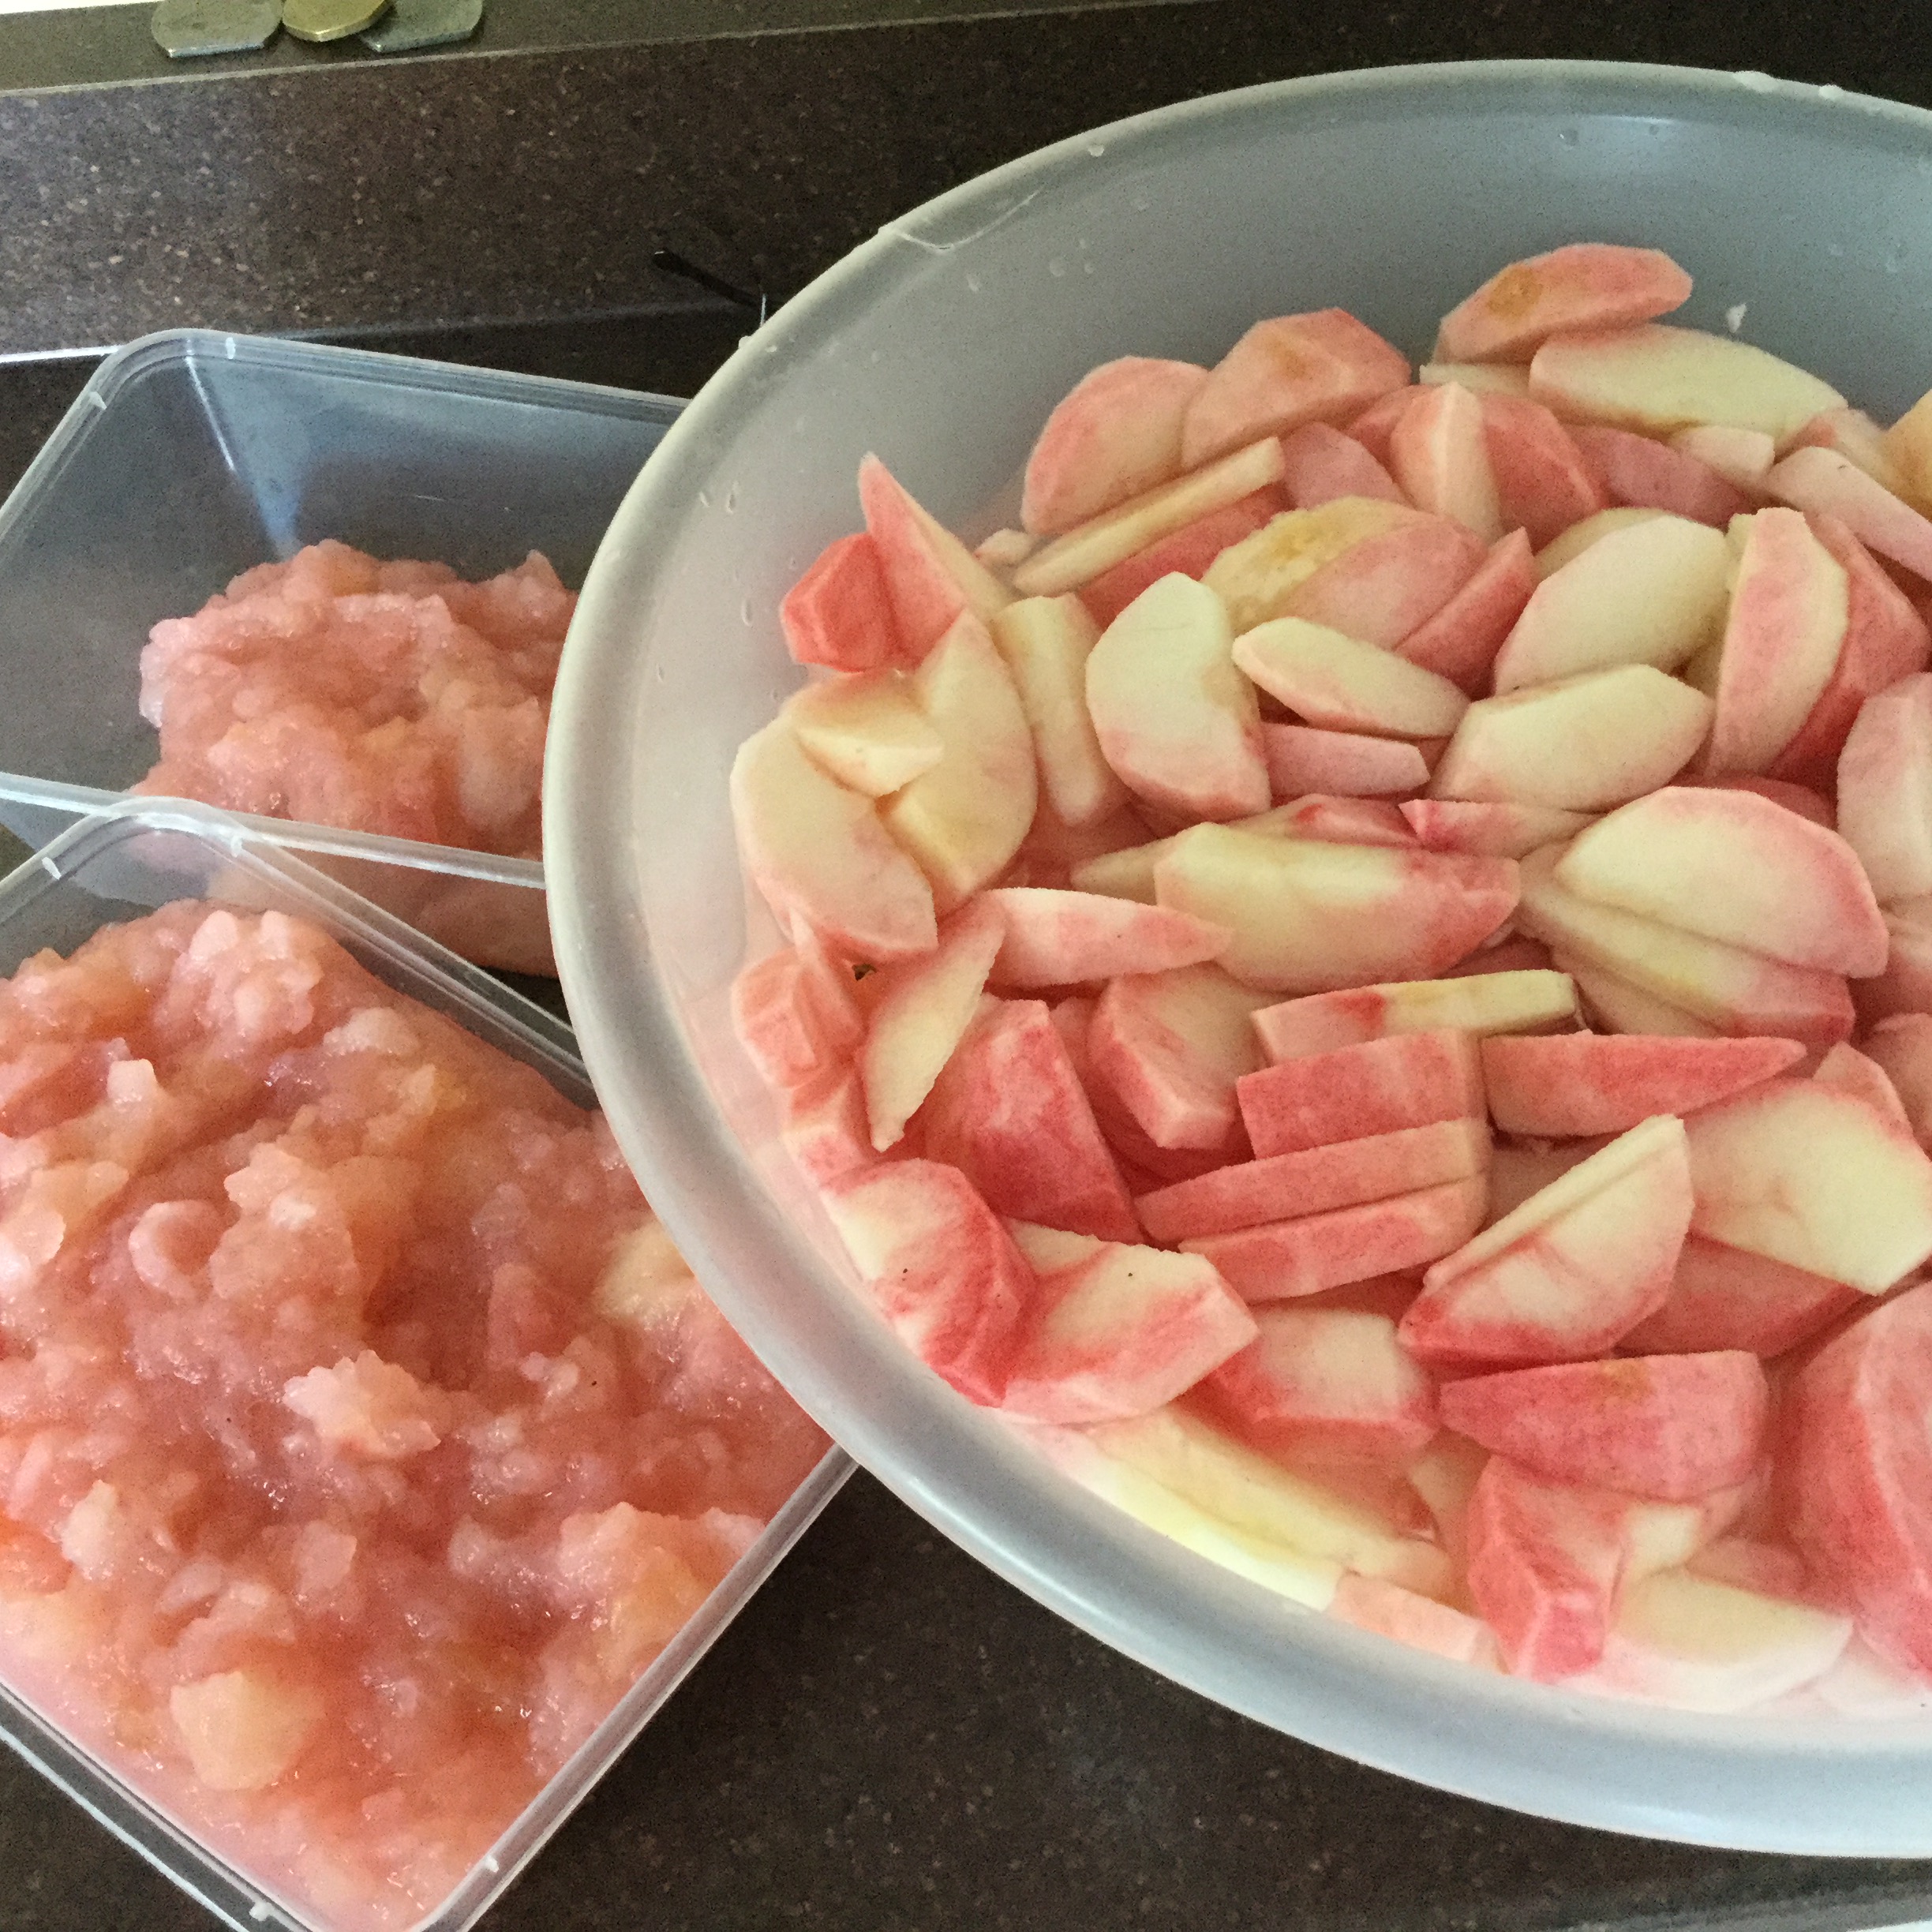
Busy preparing the apples
I love to keep boxfuls of unsweetened apple in the freezer as I often cook with apple sauce but on this cold winter’s day, I had a craving for an apple crumble and I decided to try the pink apple.
Not having tried these apples in a dessert before, I decided against sweetening them as I could always add some maple syrup later if necessary. I wasn’t wrong as these apples made the most delicious sweet crumble with their lovely fresh taste.
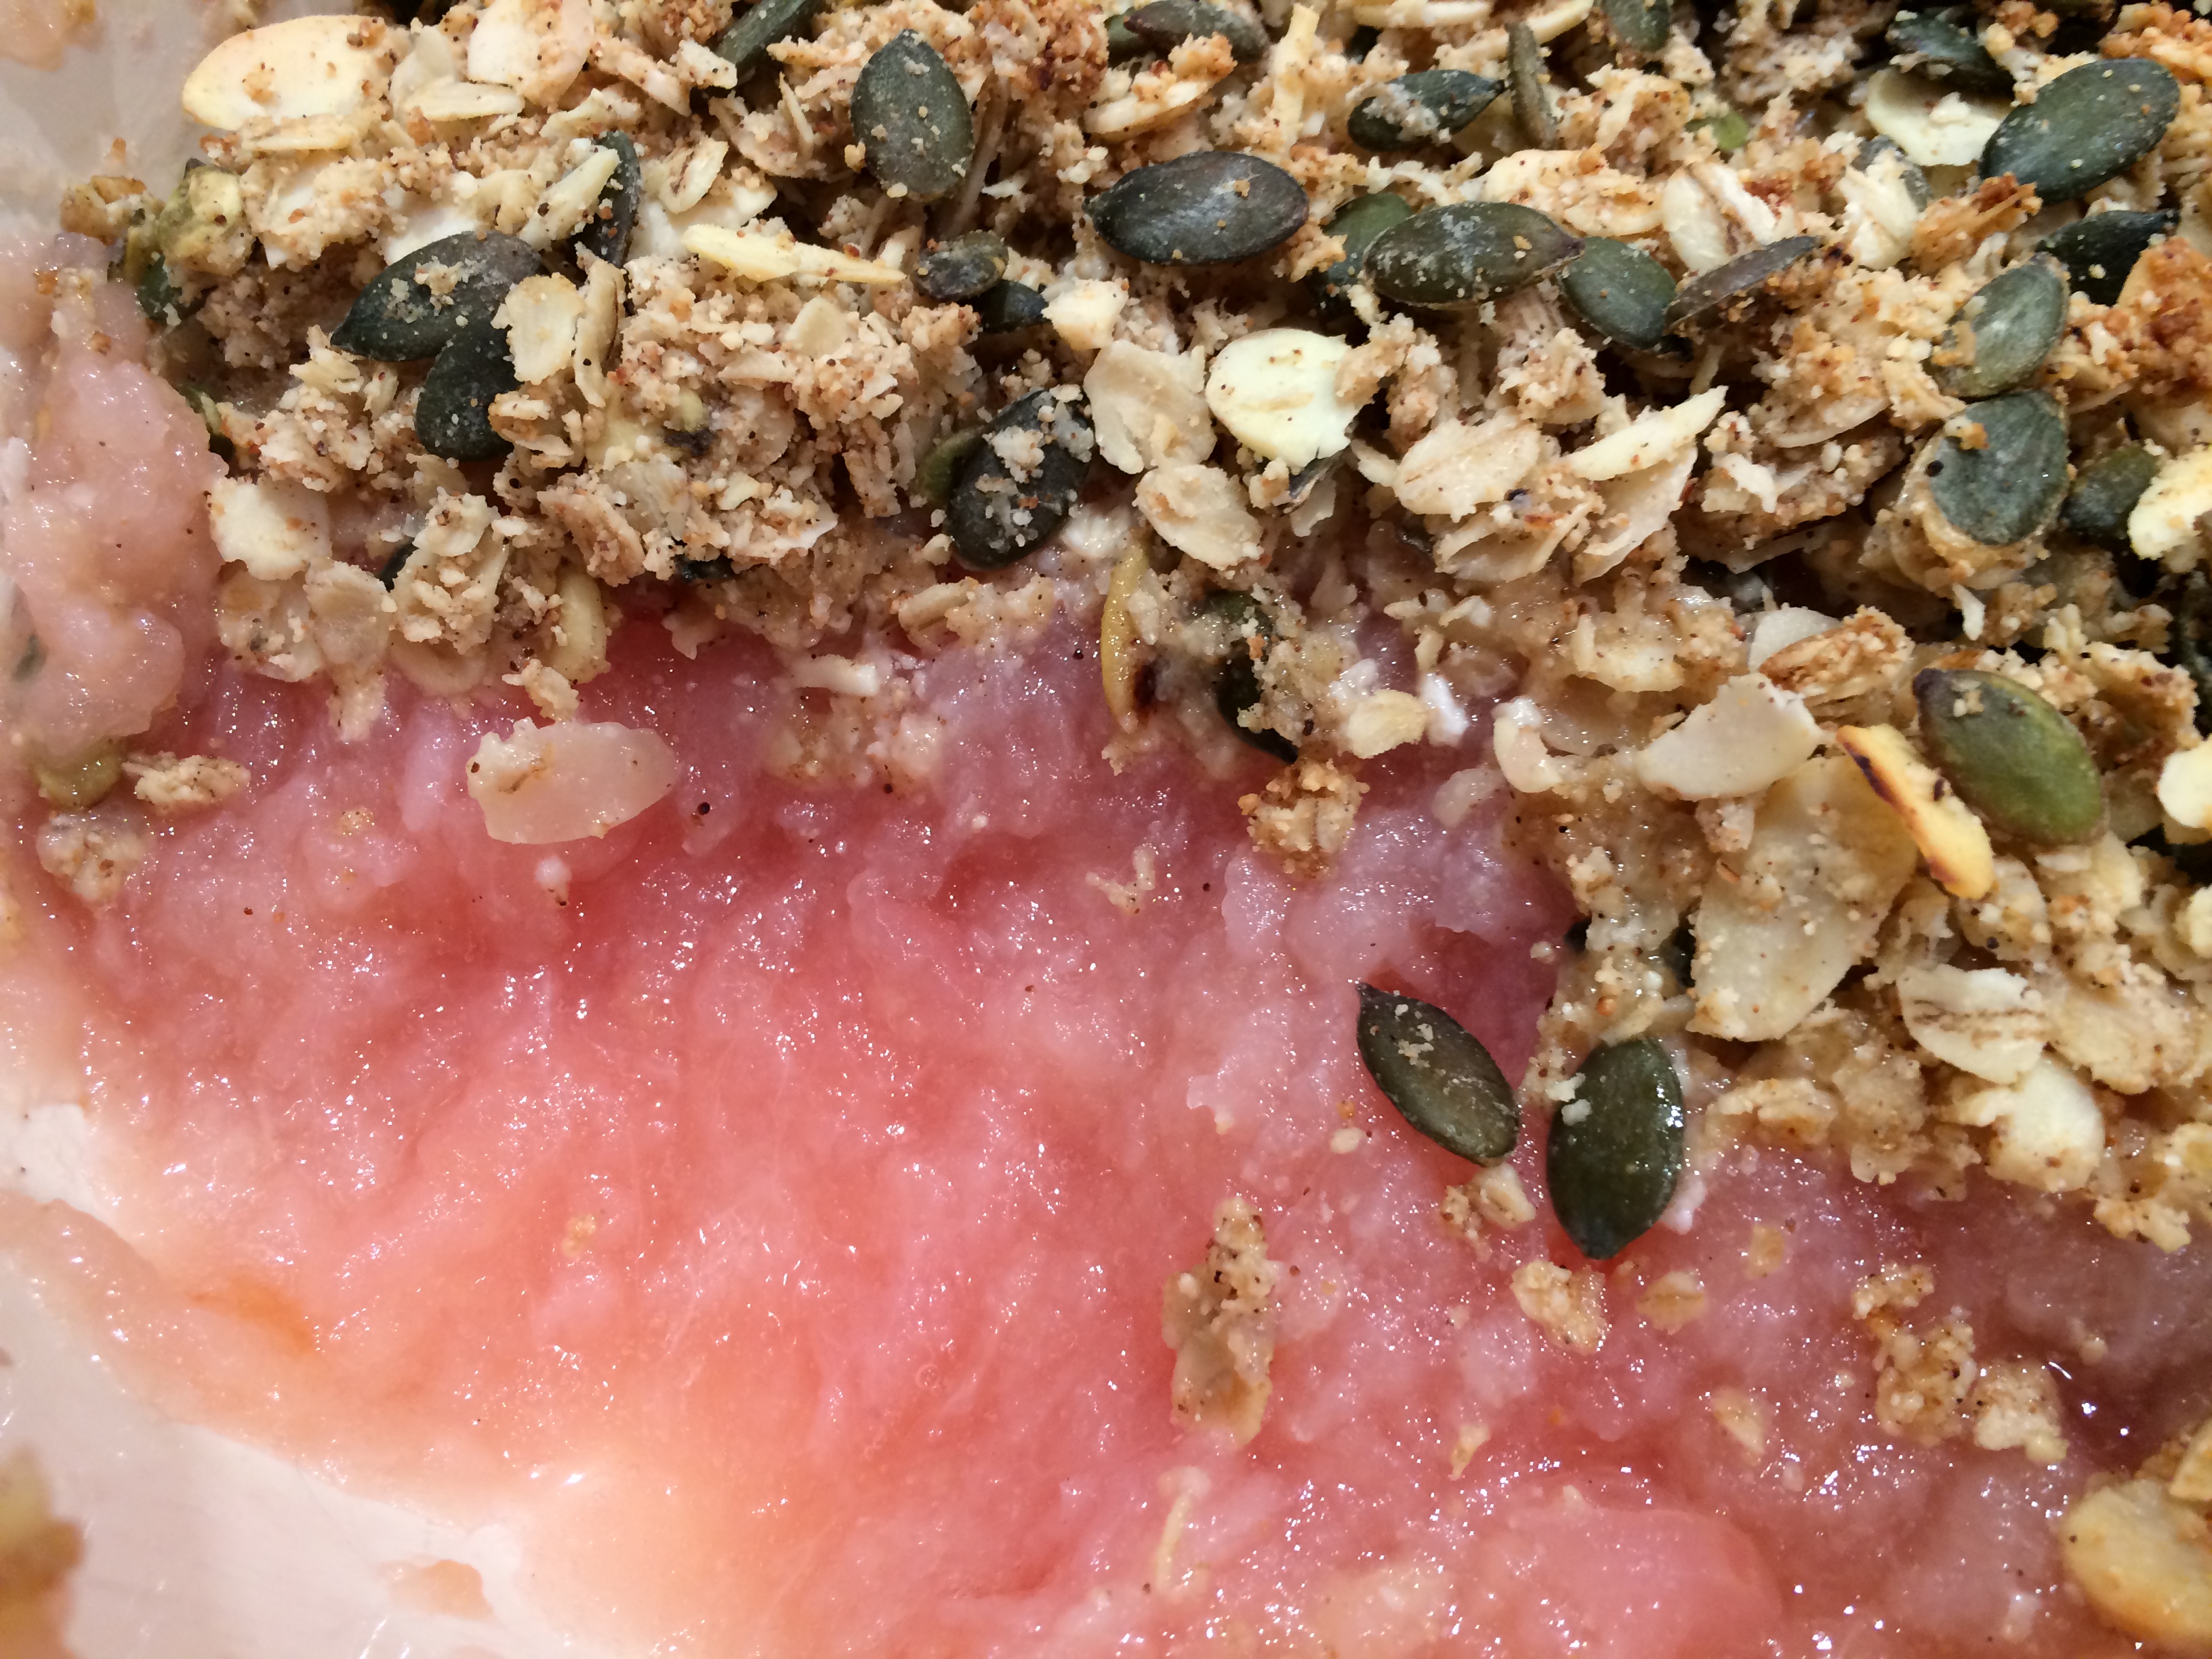
I topped the apple with my usual crumble mix of a handful each of gluten-free oats, almond flour, pumpkin seeds and flaked almonds, a large knob of butter and a good glug of maple syrup poured in once the butter has melted (in a saucepan). A quick stir and the best crumble ever ready to sprinkle over the fruit.
Bake for about 30 minutes at 350°F until the apple is hot and the crumb has browned but watch it doesn’t burn as this mix can brown very quickly.
Delicious ‘Pink’ Apple Crumble
Next year, (if I get offered any) I will remember to take a photo of the apple so that I can attempt to identify it from Google. I’d love to know the name of it.
NB: All photographs used in this blog have been taken by me and are of food I have prepared and served myself.
Our Christmas and New Year did not go according to plan. It was all down to our cat Joseph being very poorly and we were unable to leave him, so New Year away was cancelled.
I was going to take a Turkey Crown away with me but in-between Christmas and New Year the thought of it languishing in my freezer was making my mouth water as I love turkey and we didn’t have a bird on Christmas Day. I thawed it out to roast but of course I hadn’t planned on this so had no ‘extras’ in for stuffing etc. The few bits and pieces around the kitchen became my Christmas stuffing and as well as using up the left-over bits and bobs, they made a decidedly delicious stuffing, really, really tasty.
INGREDIENTS:
2 onions, chopped
2 garlic cloves, chopped
¾ cup dried gluten-free breadcrumbs
Handful of gluten-free oats
Arils from 1 pomegranate
2 teaspoons dried mixed herbs
3 rashers smoked streaky bacon cut into lardons
Sea salt
Freshly ground black pepper
2 large eggs
METHOD:
Fry the bacon lardons until they release their fat and just start to turn colour.
Place all other ingredients into a large bowl. Add the bacon together with its fat and mix well together.
Pack into a greased loaf tin and bake at 350° for about 1 hour.
A good mixture
Turn out and slice to serve with turkey or chicken.
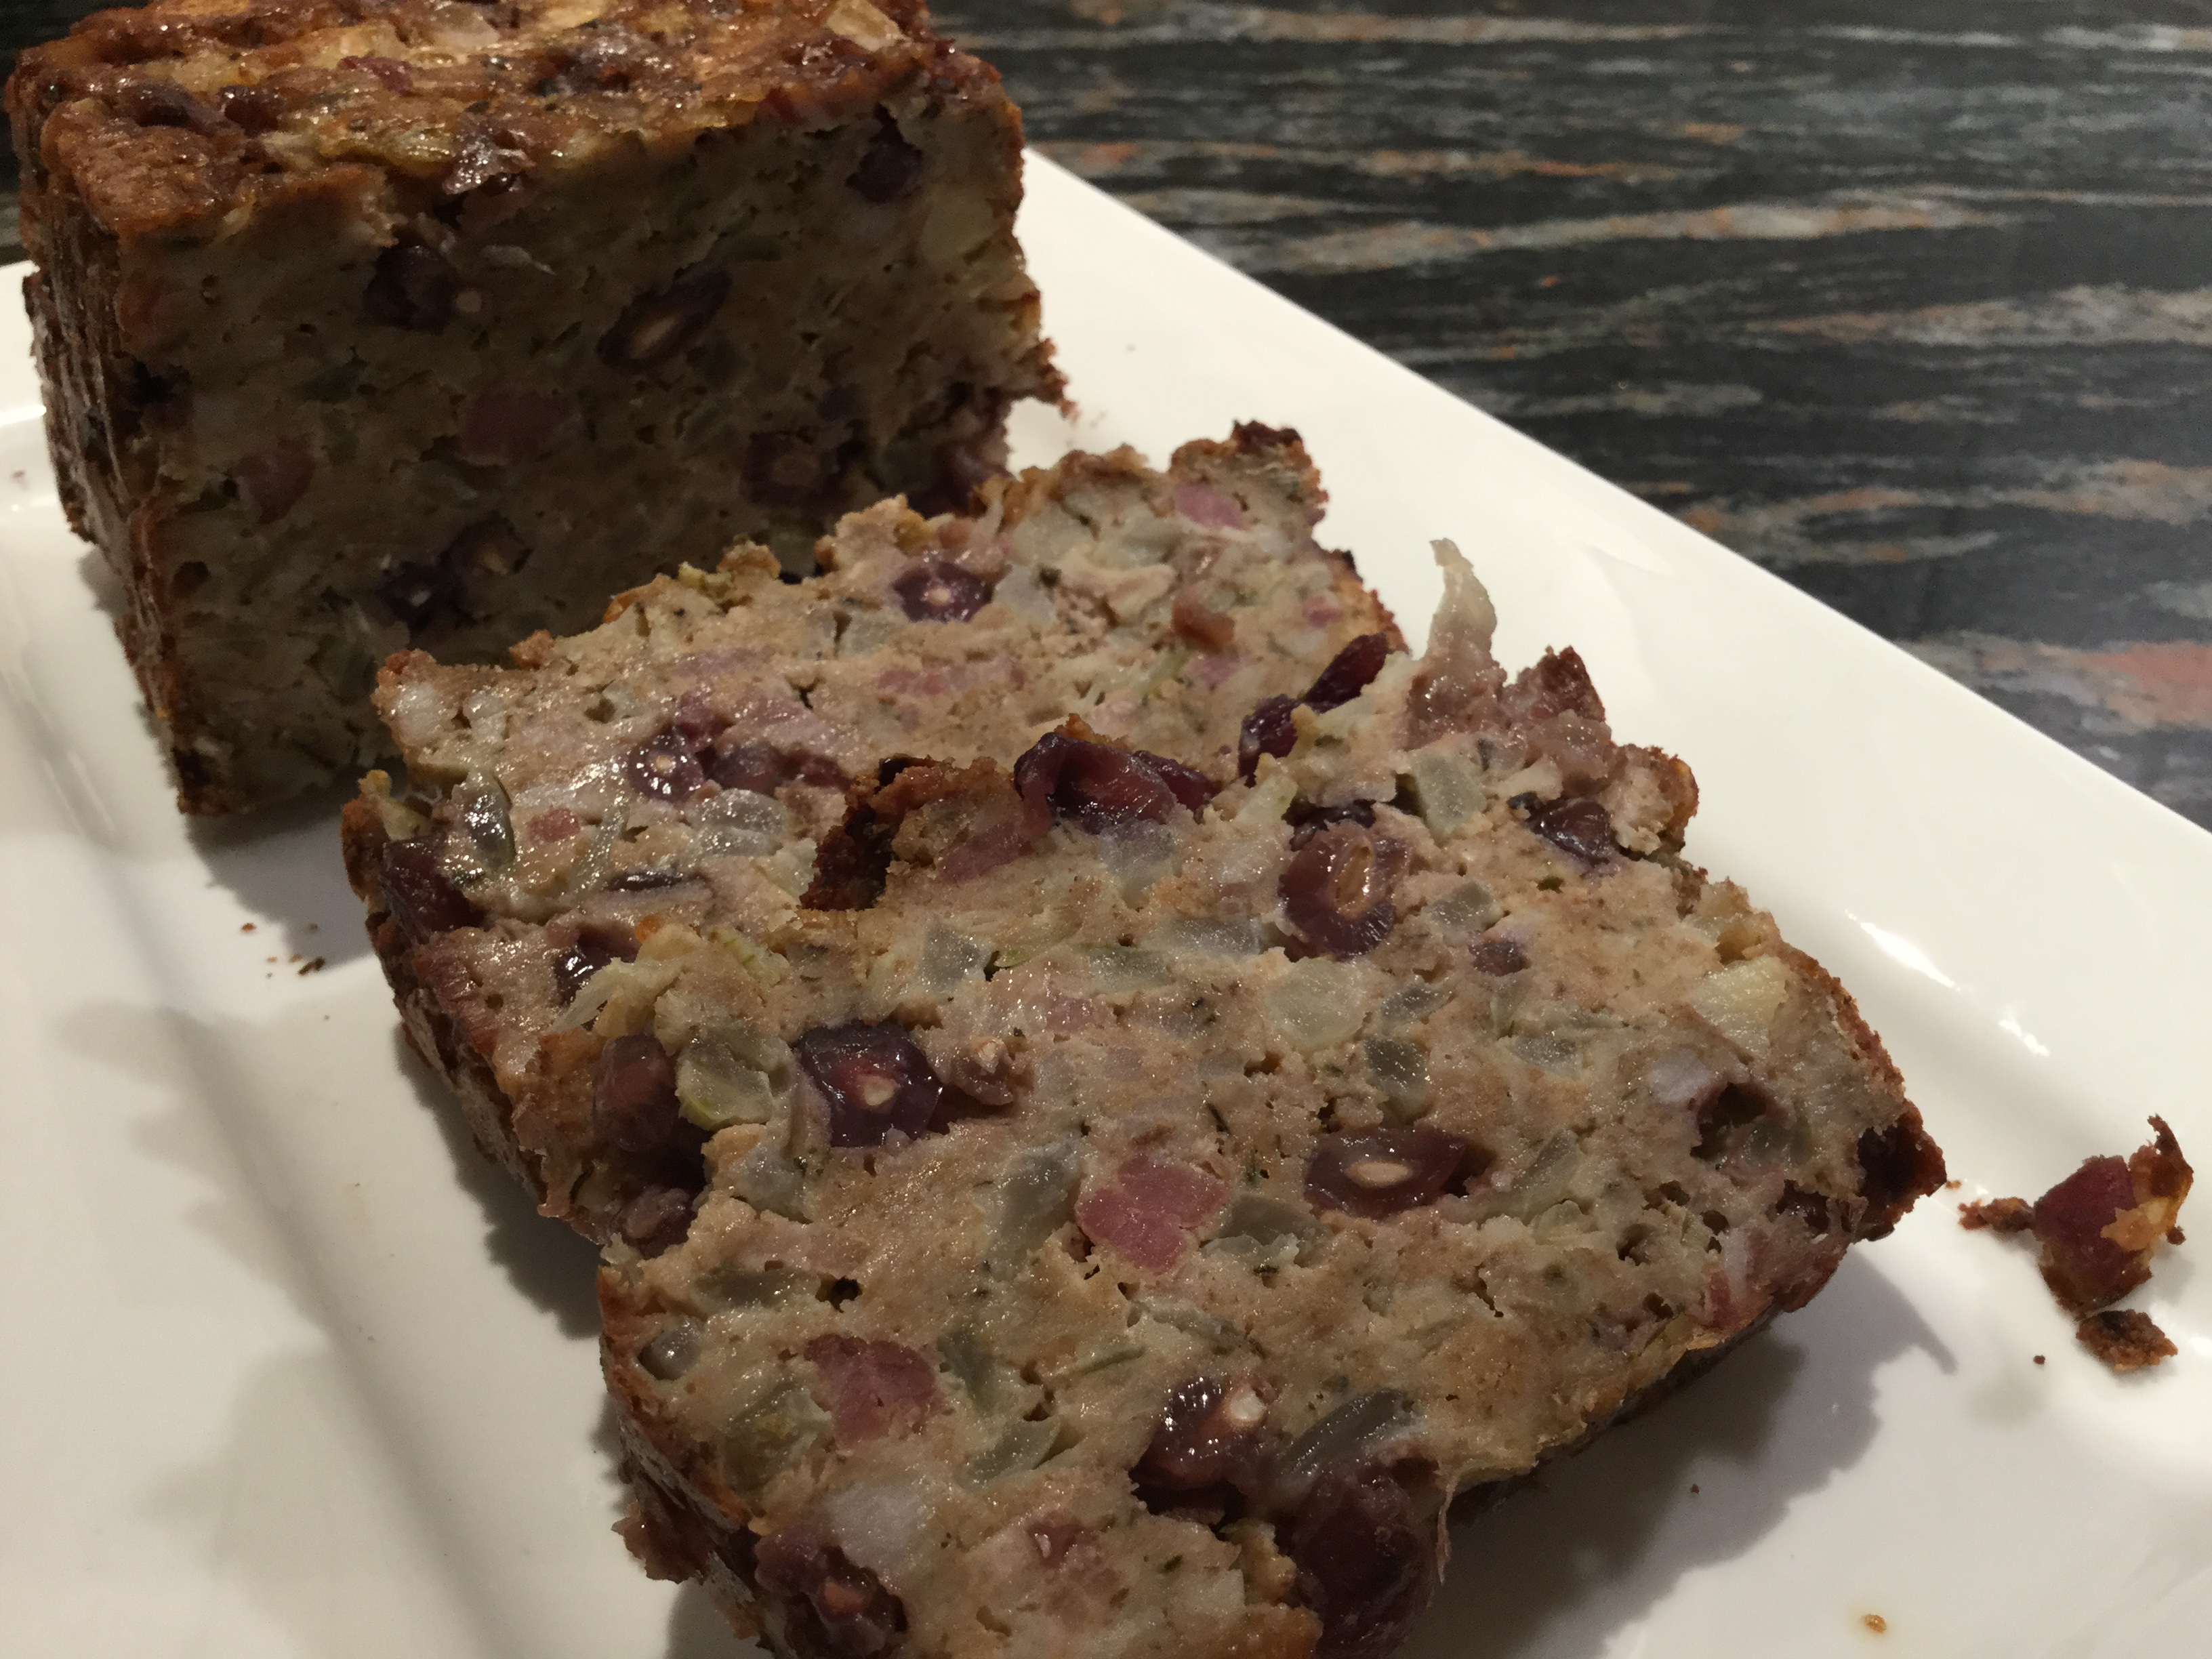
Pomegranate, Bacon and Onion Stuffing
What a success ……. this was a really tasty, moist stuffing which complimented the roast turkey well. It tasted just as nice cold when I served it up with cold sliced turkey, my mango and avocado salsa and some carrot and courgette rosti.
NB: All photographs used in this blog have been taken by me, and are of food I have prepared and served.
I love stir-fries and often do one using whatever ingredients are to hand but this recipe caught my eye and sounded really tasty using just chicken and two vegetables. The savoury sauce was lovely and tangy and very reminiscent of food served in Chinese restaurants. It was definitely a hit with us and one which I will be repeating very shortly.
Another bonus of this dish is that it takes only one pan, and also only a few ingredients so is very quick and easy to get ready.
To make it gluten-free, I used gluten-free Oyster Sauce and Tamari instead of Soy Sauce. I also used coconut sugar instead of refined sugar.
INGREDIENTS for 4 (or 2 very hungry people)
1lb chicken breasts, cut into small cubes
1 tablespoon olive oil (or oil of choice)
2 cups broccoli florets
1 cup sliced mushrooms
2 teaspoons minced fresh ginger
1 teaspoon minced garlic
¼ cup Oyster sauce (gluten-free)
¼ cup chicken stock
1 teaspoon coconut sugar
2 teaspoons toasted sesame oil
1 teaspoon Tamari
1 teaspoon cornflour
Sea salt and freshly ground black pepper
METHOD:
Heat 1 tablespoon oil in a large fry pan and add broccoli and mushrooms and cook for about 4 minutes, until just tender.
Add the ginger and garlic and stir fry for 30 seconds more. Remove from pan and cover.
Add remaining oil to pan. Season chicken and add to pan in single layer. Cook for 3 to 4 minutes on each side until golden brown and cooked through. If necessary, cook the chicken in batches.
Add the vegetables back into the pan and cook for 2 minutes until piping hot.
Whisk (in a bowl) the Oyster sauce, chicken broth, sesame oil and Tamari. Mix the cornflour in another bowl with 1 tablespoon of cold water.
Pour sauce over the chicken and vegetables and cook for 30 seconds. Add the cornflour and cook for 1 more minute.
Serve with rice of your choice; alternatively rice noodles.

Chicken, Broccoli and Mushroom Stir-Fry
Recipe adapted from Dinner at the Zoo
NB: All photographs used in this blog have been taken by me, and are of food I have prepared and served myself.

