Breakfast Eggs with Avocado and Prosciutto

The moment I saw this recipe, I knew my husband would love it.   His reaction was as expected and he commented “I have never tasted anything so nice in all my life!!!”

It took no longer to make than any ordinary cooked breakfast, but the result was superb.  I would never have thought of putting the three ingredients together but it was a match made in heaven.  The original recipe used streaky bacon but as I had Prosciutto in the fridge, I decided to use this and the result was perfect.

INGREDIENTS: to serve one

1 egg, medium or large
1 large, ripe avocado
75g Prosciutto

METHOD:

Carefully place the egg into boiling water and simmer for 6 minutes only.  Remove the egg and plunge into iced water to stop it cooking.   Peel.

image
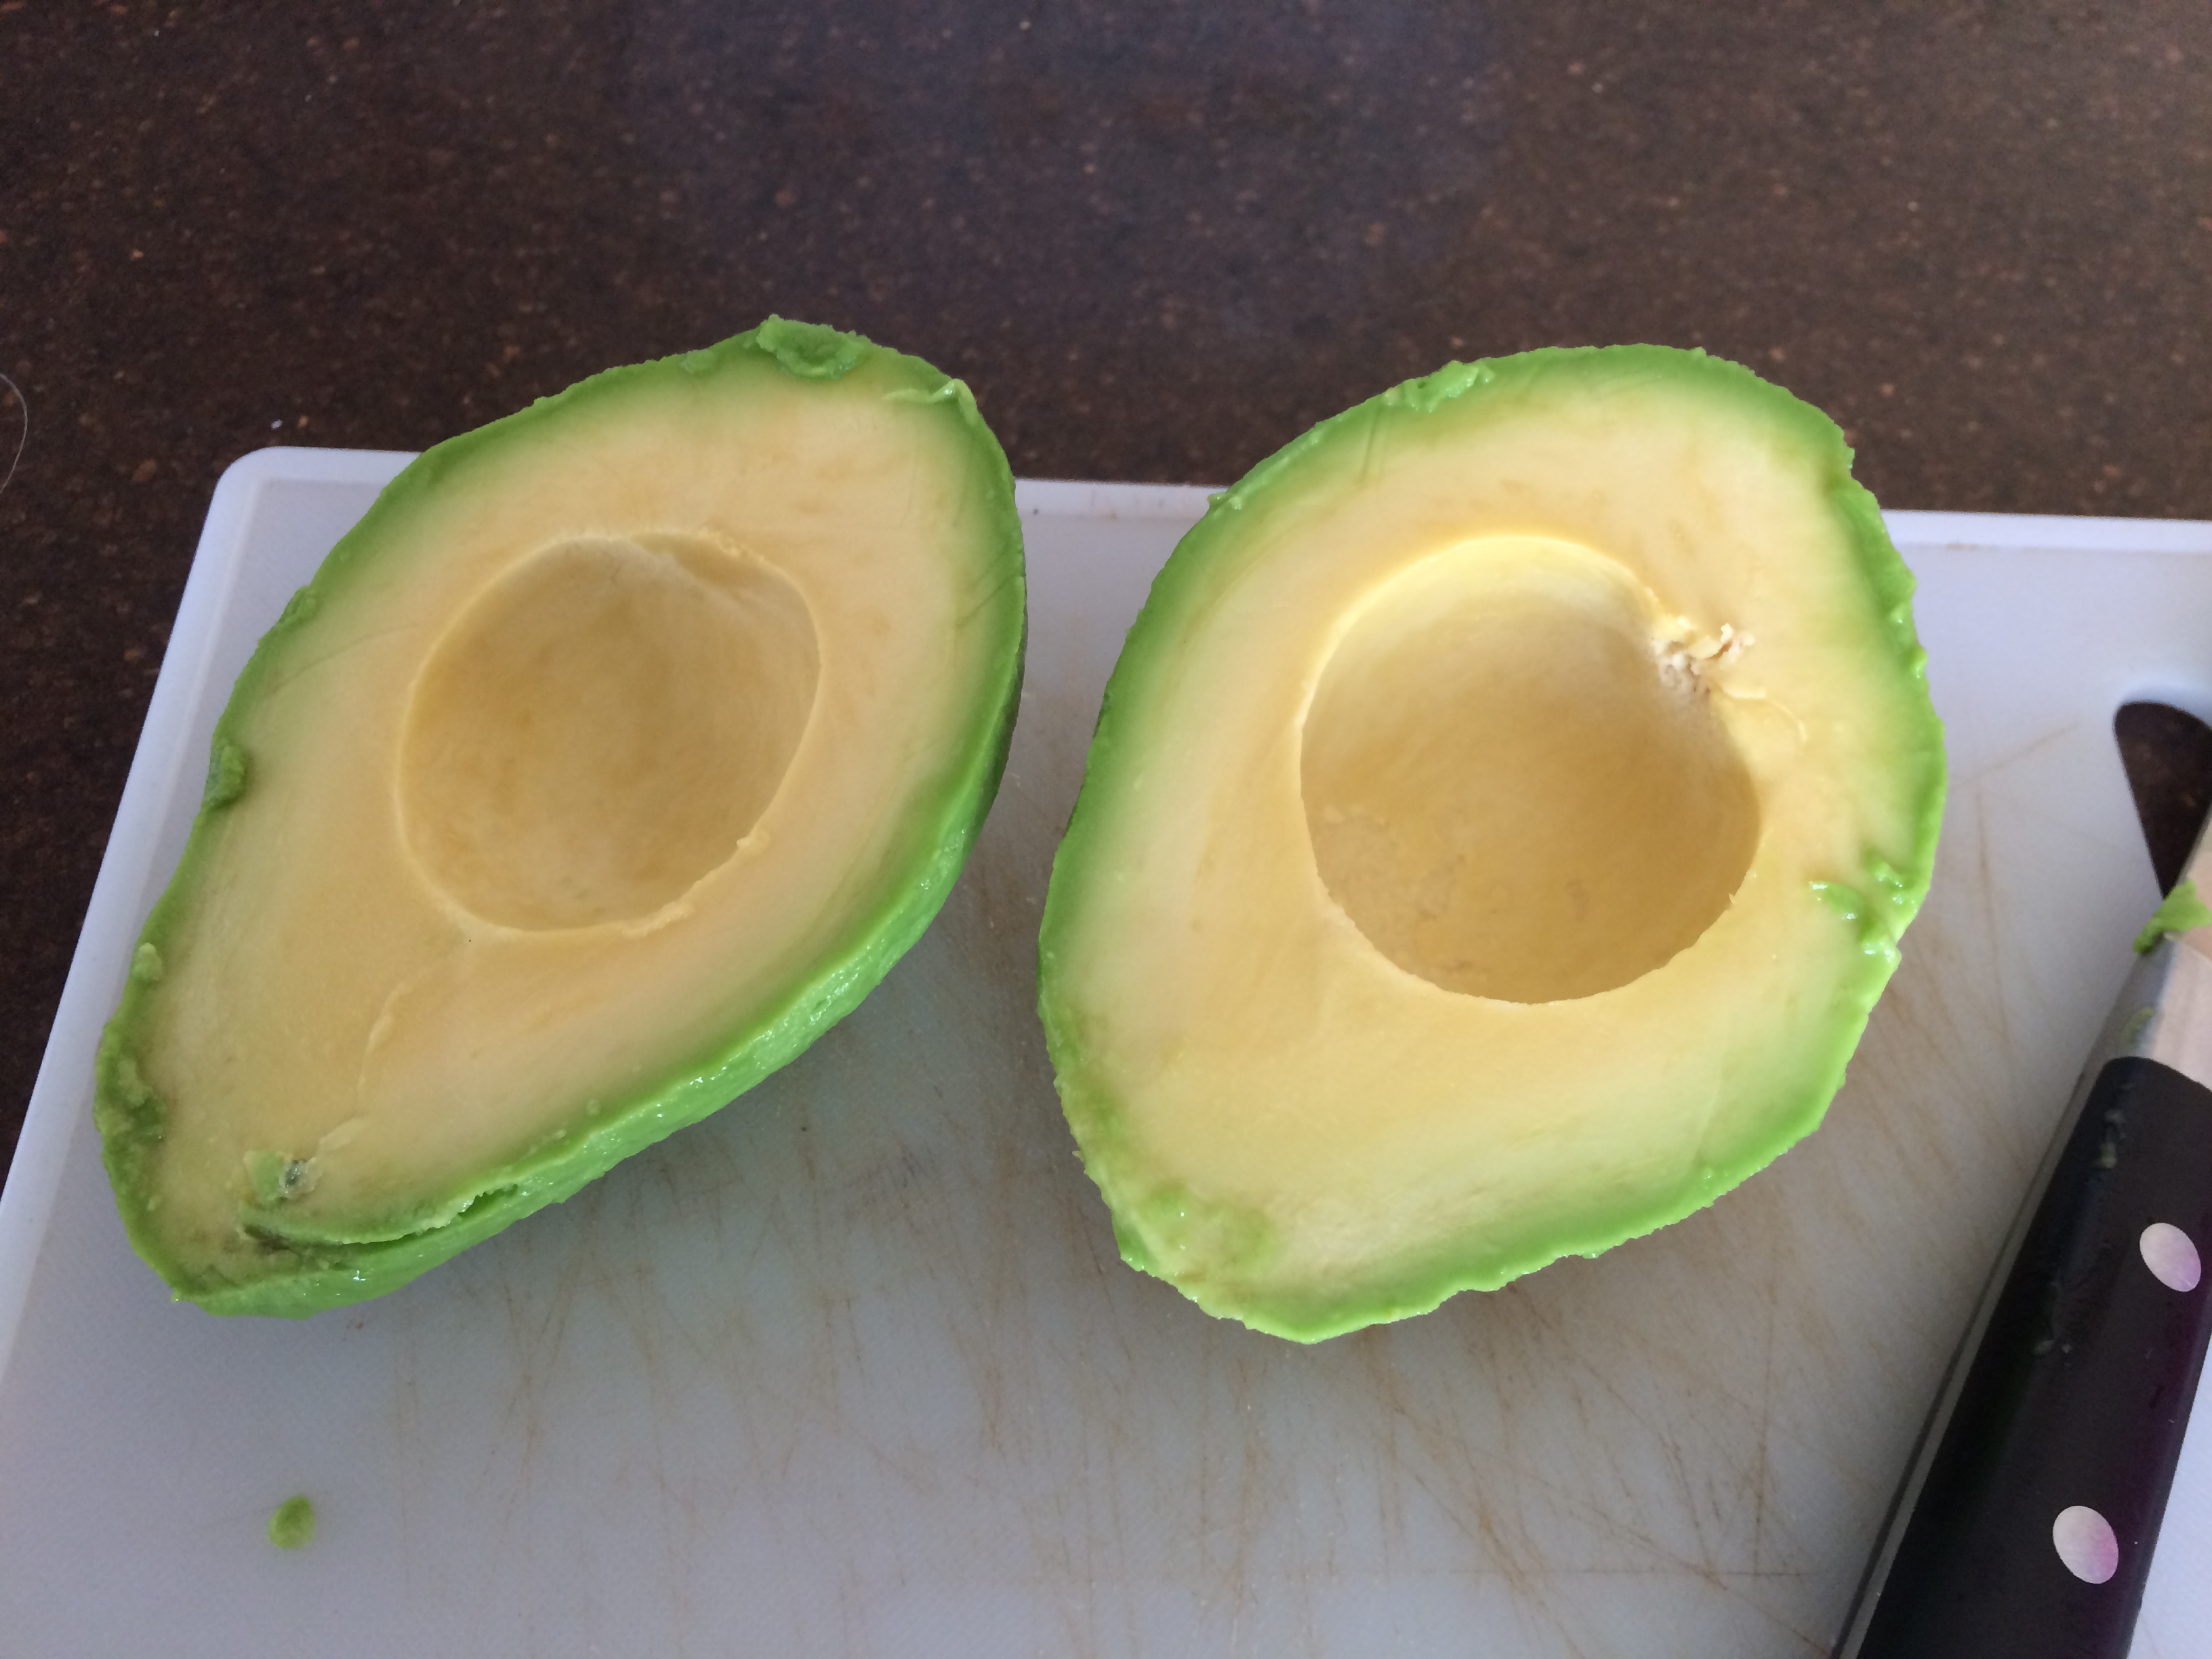
Whilst the egg is cooking, cut the avocado in half; remove the pit and skin. The easiest way to skin an avocado is to use a teaspoon and carefully push it between the flesh and the skin.

Make the hollow slightly larger so that it will accept the egg.

image
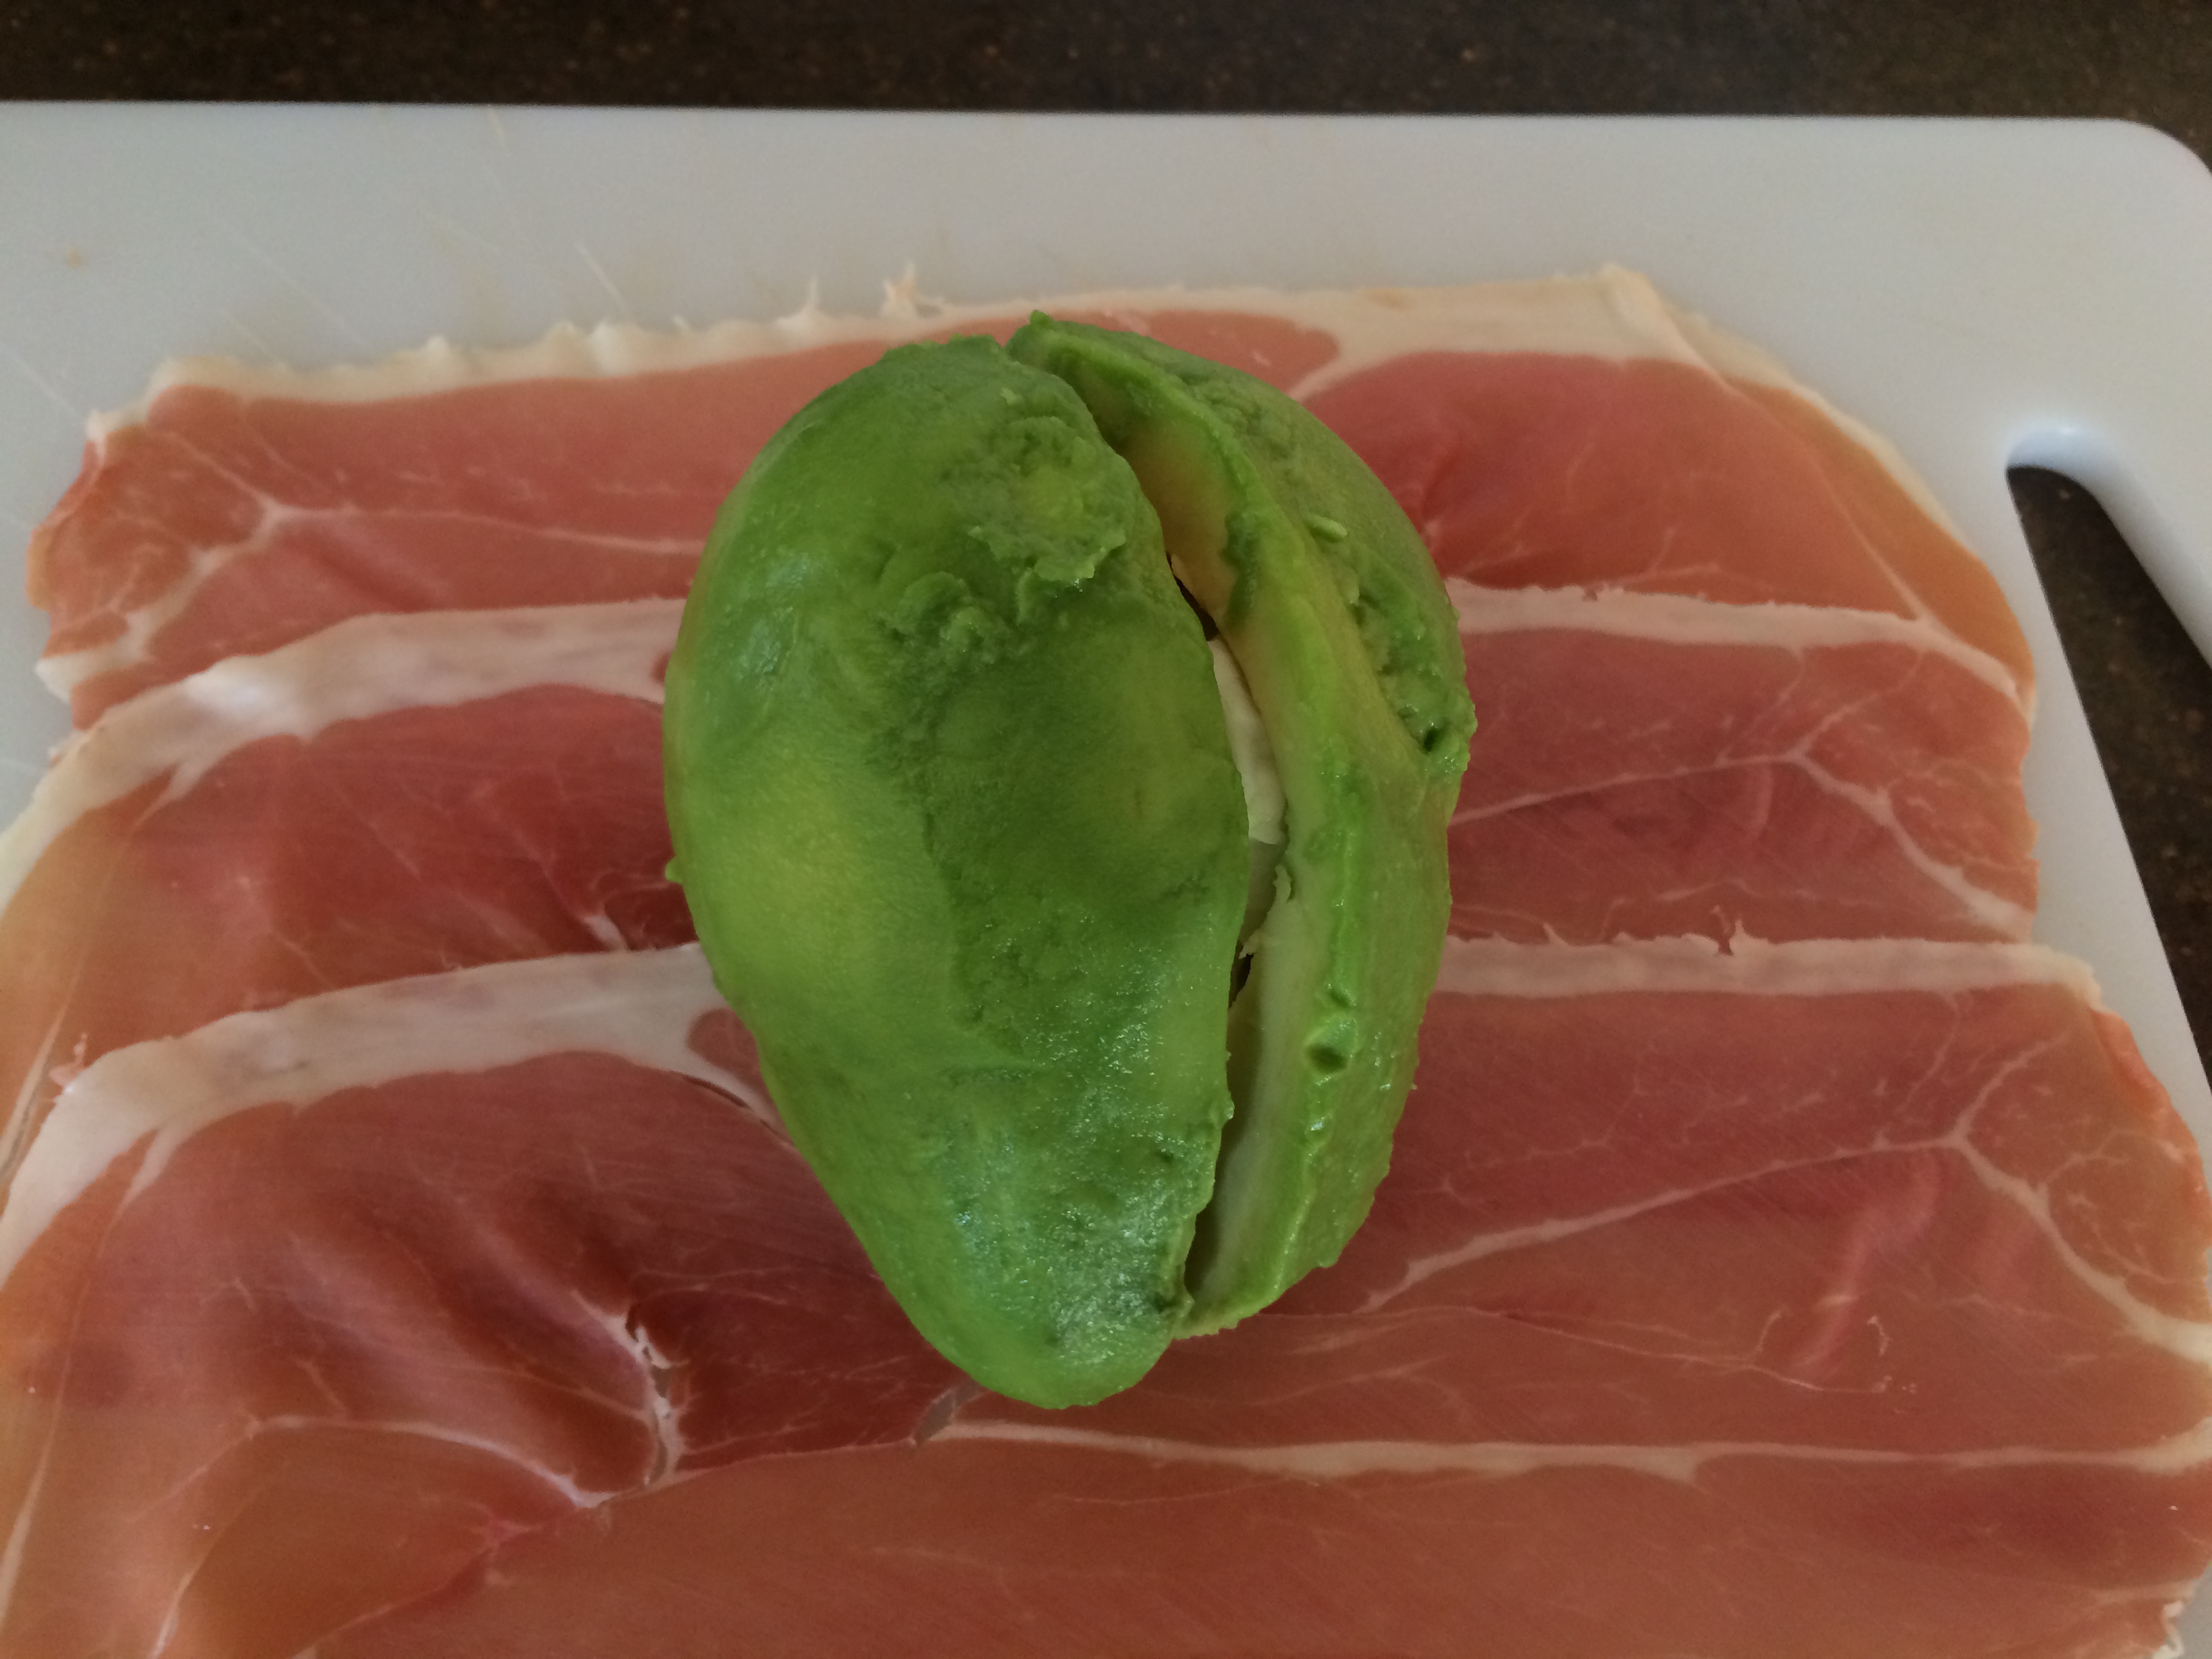
Lay about three slices of the prosciutto on a imageboard. Place the avocado on it and fold over to enclose the avocado.  Use the remaining slices to wrap around in the other direction, covering the ends.  Make sure the avocado is completely covered.

Heat your chosen oil (olive or coconut oil) in a pan and gently brown the prosciutto on all sides; cooking for about five minutes.

Transfer to a plate and slice in half.   Serve.

image

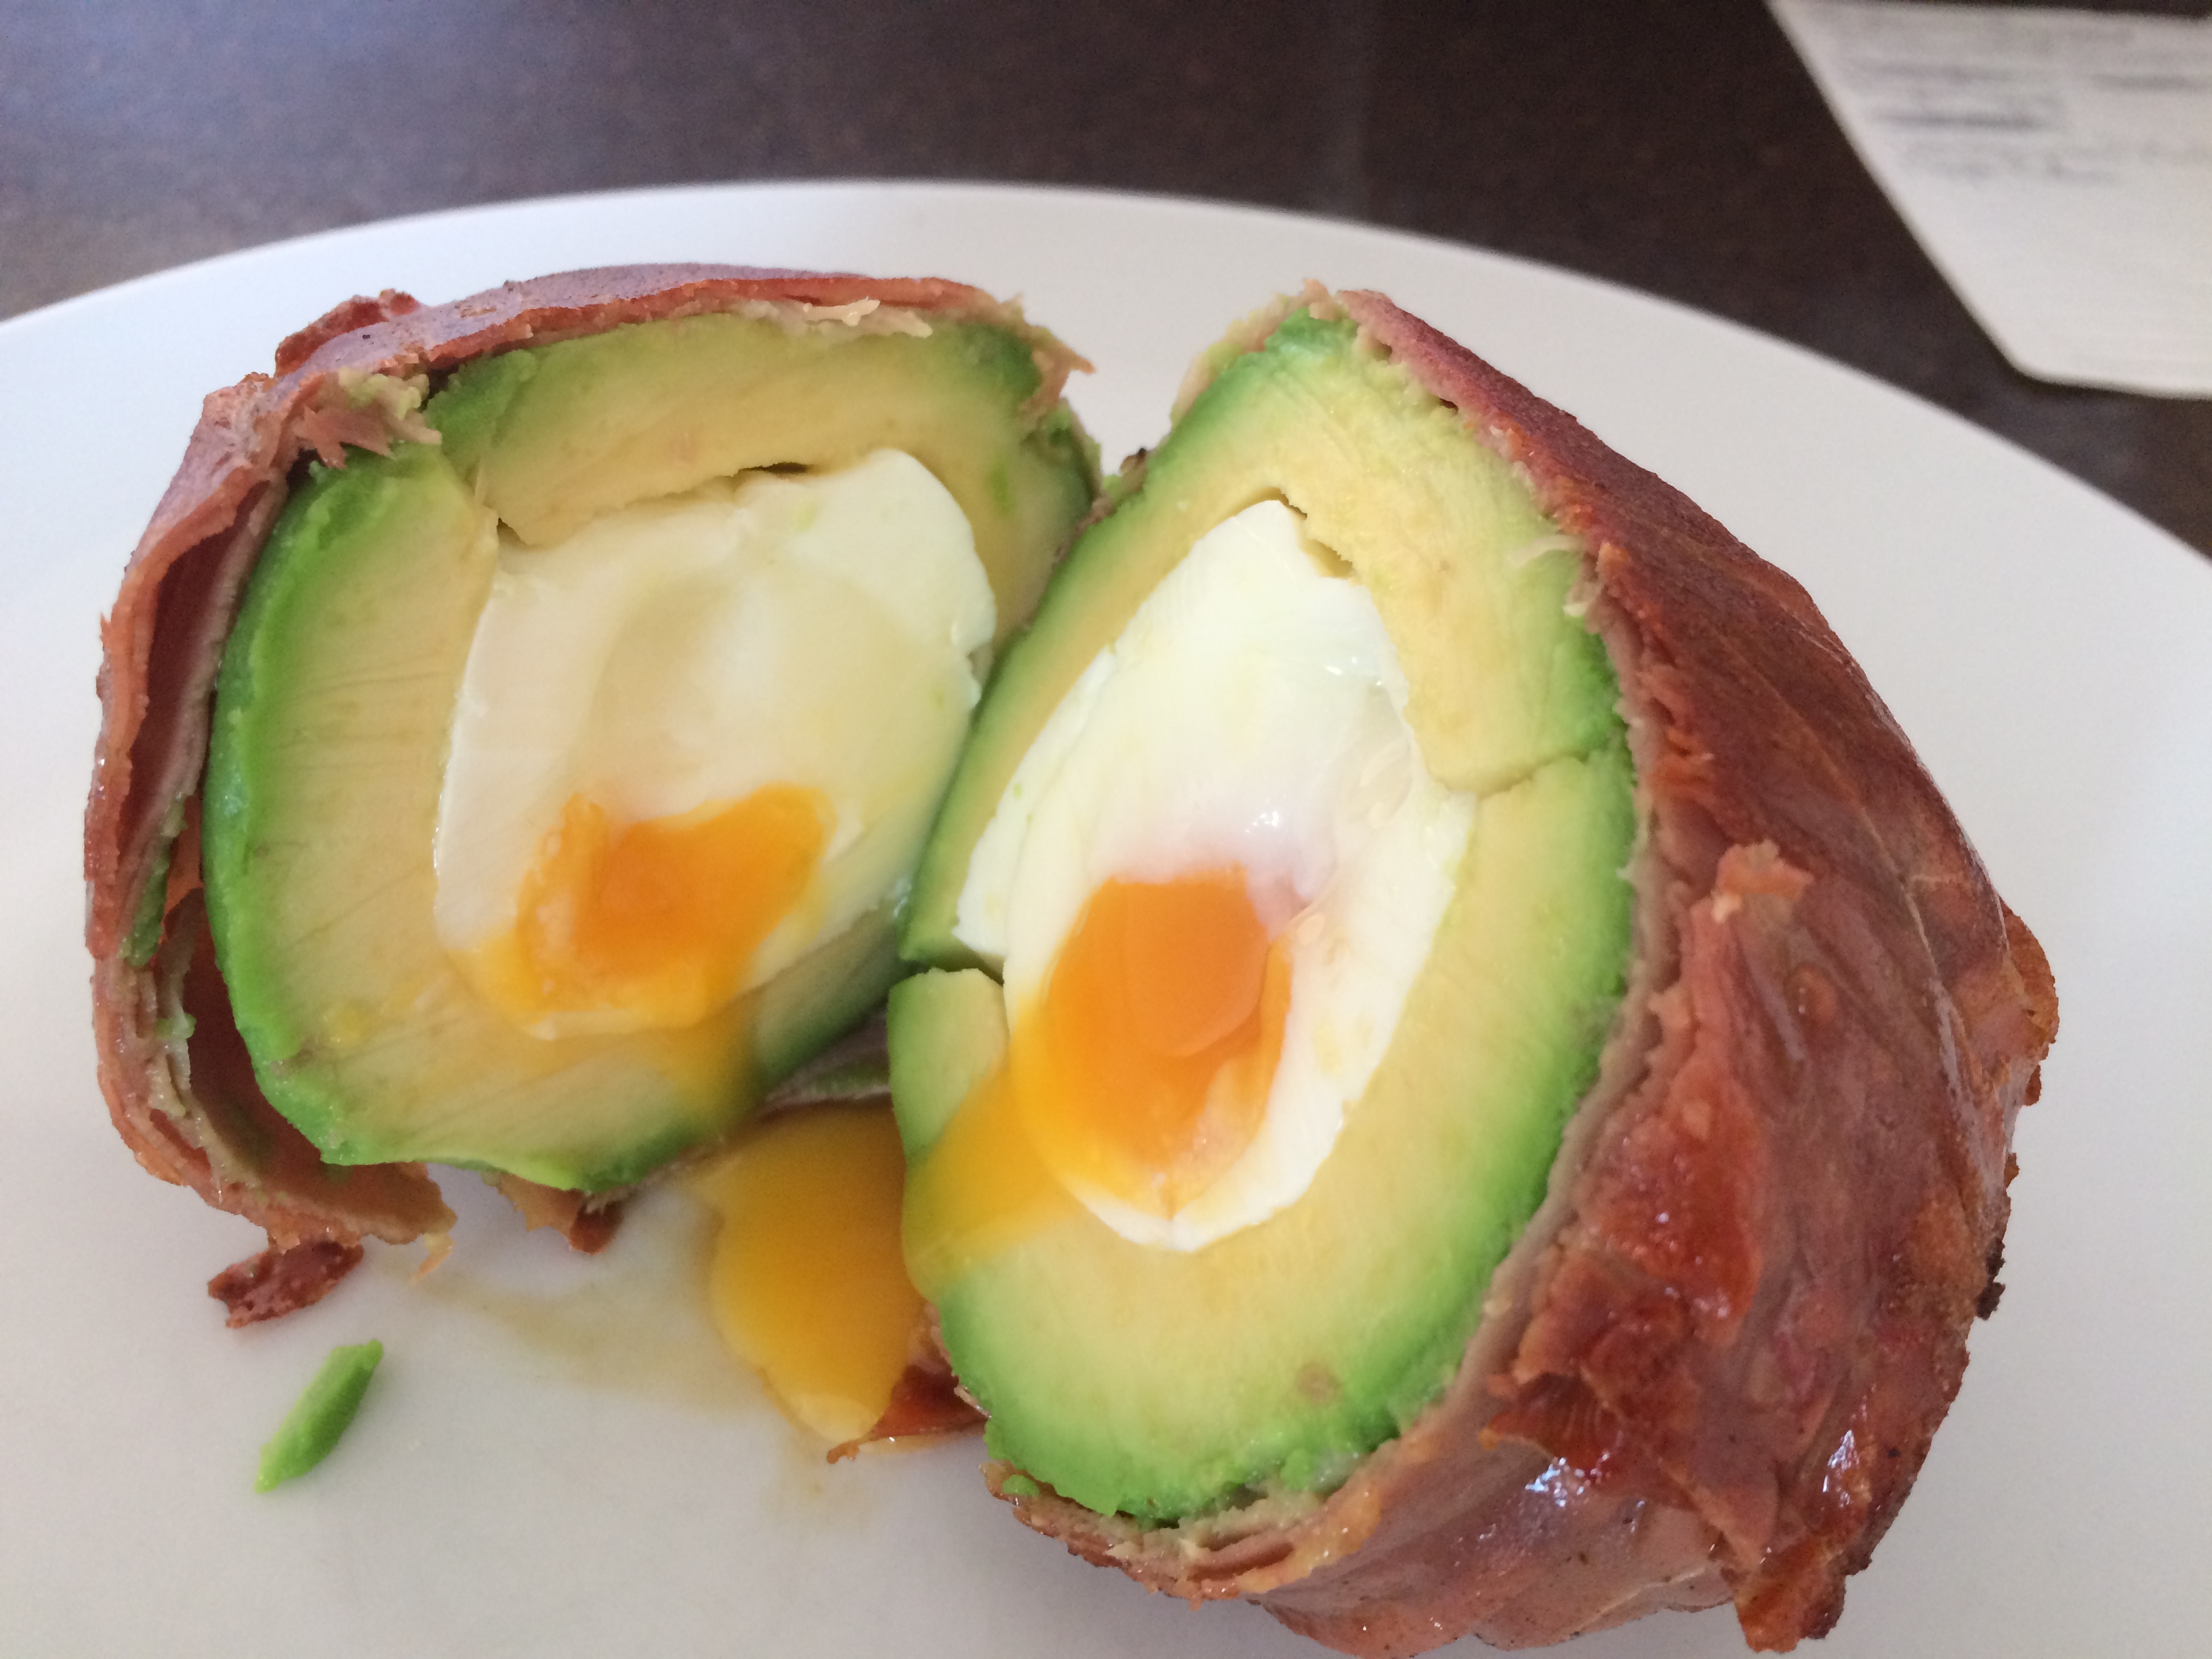
Healthy “Scotch Egg” anyone……

Recipe adapted from Twistedfood.co.uk

NB:  All photographs used in this blog have been taken by me, and are of food I have prepared myself.


Posted in Breakfast | Tagged , , , , , , , | 1 Comment

Plums with Pumpkin Seed Crumble

Somewhere, in the back of my mind, I had a vague recollection of seeing a recipe for a plum crumble, made in a skillet with nuts and seeds in the topping.   Finding myself with a wonderful bowl of red plums I searched high and low for the recipe but failed to find the one I was looking for so I decided to create my own crumble and hope for the best.

It turned out much better than I expected, and so tasty that my husband asked me to make it again just a day or so later.   The crumble is delicious, gluten-free and very quick to make.  The quantities were guesswork; approximately 75g of each ingredient makes a good amount of topping.

INGREDIENTS:
10 -12 plums
Handful pumpkin seeds
Handful flaked almonds
Handful+ gluten-free oats
Handful+ almond flour
Butter or coconut oil
Maple syrup

METHOD:

imageTo make the crumble, put the pumpkin seeds, flaked almonds, oats and almond flour in a saucepan with a knob of butter or coconut oil. Heat slowly stirring continuously until butter melted and starting to ‘cook’ the mix. Pour in a glug of maple syrup and mix well, cooking for about a minute. Leave to cool, when the mix will go crumbly.

Halve the plums, removing the stones and place in a cast iron imageskillet with a knob of butter.

Gently heat and simmer for a minute or two, turning the plums over carefully. They will cook very quickly so don’t over-cook.   At this stage, add a very tiny drizzle of maple syrup if you want to sweeten the plums.

Remove the skillet from the heat and sprinkle over the crumble. Place in a 160°C oven until the crumble is browned and the plums hot.

image

Plums with Pumpkin Seed Crumble

Serve with some delicious creamy live yoghurt.

NB:  All photographs used in this blog have been taken by me, and are of food I have prepared myself.

Posted in Sweets and Treats | Tagged , , , , , , , , | 1 Comment

Flaxseed Focaccia

I had one of those nights where I woke up at 4am and couldn’t get back to sleep.  A cup of tea and back to bed to browse the newspaper headlines (boring) and then search for interesting recipes.

My search paid off as I discovered Healthful Pursuits recipe for this gluten-free focaccia for which I had all ingredients except the Italian herbs.  I substituted oregano, and my husband woke up to the lovely aroma of baking bread.

It is such a quick and simple recipe and one which could be slightly altered by adding different herbs, that I think it will become a firm favourite of ours.  The bread toasts beautifully; could be sliced in half to make sandwiches but would be delicious dipped in oil/vinegar, spread with a salsa or anything else you can think of.  It takes just a few minutes to mix the ingredients and 20 minutes to bake.  What could be easier.  It also freezes well which is always an added bonus.

INGREDIENTS:

2 cups roughly ground flaxseed
1 tablespoon gluten-free baking powder
1 tablespoon Italian herbs
1 teaspoon sea salt
5 eggs
½ cup water
1/3 cup avocado oil or light olive oil

METHOD:

Line a 13” x 9” baking tin with parchment.
Mix the dry ingredients together in a large bowl.

Blitz the eggs, water and oil in a Nutribullet or high-speed blender until frothy.

imagePour the frothy mix on to the dry ingredients and stir until just incorporated. Leave fluffy.

Allow to stand for about 3 minutes before putting into baking tin.


BAKE for about 20 minutes at 350°F.

Lift out of tin on to rack to cool, and remove parchment.

Cut into about 12 pieces.

image

Flaxseed Focaccia

NB: All photographs used in this blog have been taken by me, and are of food I have prepared myself.


Posted in Breads | Tagged , , , , , , , | 5 Comments

Herbs, Herbs, Herbs……..

I love herbs!   I’m not sure which one is my favourite – basil is definitely up there at the top but so are coriander, mint and dill;  not forgetting parsley, rosemary and thyme.   And then there is oregano etc.  I love them all and they each have a place in different recipes.

This year I have been using dill quite a bit;  it makes a wonderful sauce/dip blitzed with live yoghurt, a spoonful of maple syrup or honey, and a squeeze of lemon juice.

Although I think my favourite light summer evening meal is sliced sun-ripened tomatoes, interleaved with mozzarella and topped with fresh basil leaves and olive oil.  Even the thought of it makes my mouth water!

2016-07-30_091618074_C390F_iOS

Greek Basil


I try to buy rooted herbs when I need fresh and have none in the garden so I  can plant them in pots to grow on.

This year I have been extremely successful with basil and also Greek basil which I always grow-on in hanging baskets as this seems to be the only way to avoid the slugs and snails who seem to love it and completely demolish the plants if anywhere near the ground.


2016-07-30_091608036_ADD63_iOS

Beautiful basil


As often happens, I end up with a glut of lovely fresh herbs just as I am going away and I know that by the time I come home, they will be past their best.

I also grow herbs on the Isle of Wight and exactly the same thing happens – they come into their best just as I am about to go home.


2016-07-30_091935298_1CF9A_iOS

Rosemary ready for drying

The more ‘woody’ herbs are easy to dry in the open air.  I have a special place in my kitchen where I hang bunches of rosemary, oregano, sage and thyme.  It’s out of the way and not in bright light so I leave the bunches until they are perfectly dry and then crumble them into airtight containers.  The dried herbs last for up to a year and can be used in many dishes.

Fresh herbs are usually added at the end of the cooking period to preserve their delicate colour and flavour, but it is best to add dried herbs earlier on so that their flavour develops.


Leafy herbs like basil, parsley, mint etc don’t dry as well hanging in my kitchen so I freeze them.   I chop the leaves and pop them either into ice-cube trays or slightly larger containers; top with water and freeze.  They can be added to so many dishes from frozen.

2016-07-30_155820875_B0681_iOS

Basil and Greek Basil being prepared for freezing

NB: All photographs used in this blog have been taken by me, and are of food I have prepared myself.


Posted in Miscellany | Tagged , , , , , , , , | 5 Comments

Carrot Cake Cookies

The original recipe for these cookies included sultanas.   I left the sultanas out and sprinkled the tops with chopped pecan nuts instead.

We eat so many bananas in our household and I buy many bunches a week but we still have difficulty leaving them to go really ripe (the more black spots the better) so when this recipe called for mashed banana and mine weren’t particularly ripe, I decided to grate them along with the apple and carrots in my food processor.  This worked perfectly and I will probably do it again to save mashing them.

These deliciously chewy cookies are well worth making and they are very difficult to leave alone as they are so tasty.

INGREDIENTS:

270g oats (gluten-free)
3 ripe bananas (about 340g)
3 red apples (about 350g)
2 carrots (200g)
3 tablespoons maple syrup
2 tablespoons cashew nut butter
1 tablespoon coconut oil
3 teaspoons cinnamon
1 teaspoon nutmeg
1 teaspoon ground ginger
Chopped pecan nuts for topping

METHOD:

2016-05-18_132238192_285EA_iOSGrate the apples (no need to peel them) and carrots, and mash the bananas (or as I did, pop the bananas through the grater as well).

Mix with all other ingredients in a bowl (except the chopped pecan nuts).

Either grease a baking sheet with coconut oil, or line with baking parchment.

Roll a dessertspoon of the mix in your hands and pat it into a cookie shape on the tray.

Sprinkle the tops with chopped pecans.

Bake the cookies for about 30 minutes in a 200°C oven until they turn golden brown.

Leave them to cool slightly before transferring them to a cooling rack.

2016-05-18_142616104_C41D1_iOS

Carrot Cake Cookies

Store in an airtight container for about 5 days.

This quantity made 25 cookies.

Recipe adapted from Deliciously Ella

NB: All photographs used in this blog have been taken by me, and are of food I have prepared myself.

Posted in Miscellany, Sweets and Treats | Tagged , , , , , , , , | Leave a comment

Coconut Curry Prawn and Noodle Soup

This soup is a real meal in itself.  The flavours are superb and the coconut milk adds a wonderful smoothness.

I was also pleased to find that I had all the ingredients to hand so was able to make this soup without having to buy anything.  I’ve been very lucky with my cilantro (coriander) this year as I have been buying rooted plants when I’ve needed it, and then planting the roots in hanging baskets outside my back door.  They’ve grown well and at the moment are keeping me amply supplied.

INGREDIENTS:

2 tablespoons olive oil
1 small white onion, thinly sliced
1 cup sliced mushrooms
4 garlic cloves, finely chopped
2 tablespoons fresh grated ginger
2 tablespoons red curry paste
3 ½ cups chicken stock
1 15oz can full-fat coconut milk
3 tablespoons fish sauce
2 tablespoons honey
1 red bell pepper, cored and thinly sliced
1lb raw peeled, de-veined prawns (I used cooked prawns)
4oz rice noodles, cooked according to package
Cilantro for garnish
Lime wedges for garnish

METHOD:

Heat the olive oil in a large pot over a medium to high heat. Add the onions and mushrooms and cook until the mushrooms are beginning to turn brown, about three minutes.   Stir often.

2016-06-17_112833577_CDEE6_iOS

Saute the onions and mushrooms

2016-06-17_113702785_E6EF3_iOS

Ginger, garlic and red curry paste


Add the garlic, ginger and curry paste and cook for a further minute, stirring continuously.

Stir in the chicken stock, coconut milk, fish sauce and honey and bring to a simmer.

Add the red pepper and simmer gently for 15 minutes, stirring occasionally.    Add the prawns and simmer until they just turn pink, about two minutes.   As I used ready cooked prawns, I allowed them to simmer for a few minutes to heat through.   I used fine rice noodles, added them to the soup with the prawns and they cooked as the prawns heated.

Ladle the soup into bowls, top with some cilantro and serve with lime wedges to squeeze over.

2016-06-17_121745311_333A2_iOS

Coconut Curry Prawn and Noodle Soup

Recipe adapted from Nourished Peach

NB: All the photographs used in this blog have been taken by me, and are of food I have prepared myself.

Posted in Brunch, Dinner, Lunch, Soups | Tagged , , , , , , , , , , , | Leave a comment

Frozen Yoghurt Fruit Cake

I have to laugh at myself sometimes as to where and when I find recipes to try.   It was probably the hottest night of the year recently and I couldn’t sleep, so I was scrolling through the internet about 2am and found this delicious looking recipe and decided it would be a perfect ‘cake’ to have in the freezer for when my family come over to the Isle of Wight for a visit this summer.

I blitz frozen fruit and yoghurt all the time for an ice-cream type of dessert but this ‘cake’ would be ideal to have ready prepared.   I made my first ‘cake’ the very next morning and my grandchildren called in at an appropriate time to try it out.  Empty bowls – success!

INGREDIENTS:

250g strawberries
250g raspberries
250g bananas
250g blackberries or blueberries
16 tablespoons natural live yoghurt

METHOD:

Line a loaf tin with clingfilm.

Blitz one of the fruits with 4 tablespoons of yoghurt and pour into tin. Pop in freezer until it starts to freeze.

Rinse the blender out and blitz another fruit with yoghurt and repeat, freezing between layers.

Freeze until solid.

Leave the frozen ‘cake’ in the fridge for about an hour before needed to allow it to slightly soften;  serve in slices with extra fruit.

2016-07-22_082139729_6A220_iOS

Frozen Yoghurt Cake


Thank you for the recipe Jamie Oliver

NB: All the photographs used in this blog have been taken by me, and are of food I have prepared myself.

Posted in Miscellany, Sweets and Treats | Tagged , , , , , , , , , , | 1 Comment

Chicken with Olives and Sun-Dried Tomatoes

I’ve been doing a lot of slow-cooking lately as I am stocking up the freezer for my husband whilst I am away, and it also means that I don’t have to spend too much time in the kitchen during this wonderful weather we are having.

I recently found a new book called The Slow Cooker: A Celebration of The Slow Cooker by Love Foods which contains so many wonderful recipes that it has completely changed my mind about the use of a slow-cooker.  This recipe is one of them and it is so simple to make and tastes delicious when cooked.  I cooked my chicken on LOW for 8 hours and the meat just fell away from the bone and melted in your mouth.  A very Mediterranean taste to it which we just loved.

As my husband is gluten-intolerant, I used buckwheat flour to coat the chicken, and served it up with gluten-free pasta.  It made two good meals with plenty left-over for freezing into individual portions.

INGREDIENTS:

2lb skinless, bone-in chicken thighs
1 teaspoon salt
½ teaspoon pepper
1oz gluten-free or buckwheat flour
2 tablespoons olive oil
1 onion, diced
3 garlic cloves, crushed
4 fl. oz dry white wine
2 x 400g cans or cartons chopped tomatoes
4oz stoned Kalamata olives, quartered
2 ¾ oz sun-dried tomatoes, chopped

METHOD:

Place the flour in a large plastic bag together with half of the salt and the pepper. Add the chicken thighs and shake well to coat.

Heat the oil in a large fry pan and add the chicken pieces. Cook on each side for about 4 minutes until brown. Do this in two batches if necessary. Place the chicken in a slow cooker.

2016-07-19_084822933_63784_iOS

Wonderful colours of the onion/tomato mix simmering away

Add a little more oil to the pan if needed and gently sauté the onions and garlic for about 15 minutes until soft. Add the wine and bring to the boil, stirring continuously for about 2 minutes.

Add the tomatoes, olives, sun-dried tomatoes and the remaining salt. Cook for about 1 minute.


Add the mixture to the chicken in the slow cooker. Cover and cook for 4 hours on HIGH or 8 hours on LOW.

Serve hot with gluten-free pasta.

2016-07-19_163105752_7A86E_iOS

Chicken with Olives and Sun-Dried Tomatoes served with Gluten-Free Pasta

Chicken drumsticks could be used in place of the thighs, or a combination of both.

NB: All the photographs used in this blog have been taken by me, and are of food I have prepared myself.

Posted in Dinner, Supper | Tagged , , , , , , , , , | Leave a comment

Spicy Kale Chips

I’ve written about kale chips before but on a very hot sunny evening recently my d-in-law, Juicy Health Co. uploaded a recipe on Facebook using a mix of turmeric, paprika, onion powder, sea salt and pepper and rubbed with some apple cider vinegar and olive oil – and I just couldn’t resist turning the oven on again and digging out the bag of fresh kale I had in the bottom of my fridge.

My husband and I sat outside in the sunshine devouring the chips (more like crisps really) and argued over the crumbs.    I was too quick in reading the recipe and also added some hot chilli powder but the chips turned out amazing, if a little hot !

They really are so easy to make. 2016-07-17_164646350_71D4C_iOS  Tear the kale into pieces, removing any hard stems.

Sprinkle over the seasonings, vinegar and a lug of olive oil and massage the kale with your hands.  It’s quite therapeutic doing this and it makes the kale turn bright green; turning it from bitter and tough into silky and sweet.  A couple of minutes massaging ensures perfect chips.

2016-07-17_164937002_1095D_iOS


Put the seasoned and massaged kale on a large baking sheet and pop into a hot oven 190°C for about 12 to 15 minutes, until it is just starting to crisp but not burn.

As it cools, it crisps up.


Transfer into a bowl and enjoy a healthy, nutritious snack.  Make it as mild or as spicy as you want.

2016-07-17_170254848_986D5_iOS

Crispy Kale Chips

NB: All the photographs used in this blog have been taken by me, and are of food I have prepared myself.

Posted in Miscellany, Vegetables, Vegetarian | Tagged , , , , , , | Leave a comment

Stuffed Mushrooms #2

After the success of making stuffed mushrooms recently using leek, tomato and pine nuts, I decided to make a different filling using ingredients I had in the kitchen.   These turned our really well with their slightly African taste from the Berbere spice.

INGREDIENTS:

2 onions
2 large carrots
Handful of raisins
Handful of flaked almonds
2 teaspoons Berbere spice
Olive oil for cooking
4 large mushrooms (Portobello or large field mushrooms)

METHOD:

Peel and finely chop the onion and grate the carrot.

Heat a little oil in a fry pan and gently sauté the onion and carrot for a few minutes before adding the raisins, almonds and spice. Fry gently for a few more minutes to release the wonderful aroma of the spice. Set aside to cool.

2016-05-01_151020179_4EAC8_iOS

Onion, carrot, raisins and flaked almonds before adding the spice

Remove the stalks from the mushrooms. Heat a little oil in the fry pan and carefully fry the mushrooms for one minute on each side. Remove from pan and place on a baking sheet.

Fill with the onion/carrot mixture.

Bake for approximately 20 minutes at 160°C. Leave to stand for a minute or two and serve warm.

I’ve made this recipe a few times now but each time have been so keen to eat them that I have forgotten to take a photo of the finished mushroom.  Believe me, they are delicious and very, very tasty.

NB: All the photographs used in this blog have been taken by me, and are of food I have prepared myself.

Posted in Brunch, Dinner, Lunch | Tagged , , , , , , , , , , , | Leave a comment